Difference between revisions of "Documentation/4.5/Extensions/SlicerHeart"
From Slicer Wiki
(Nightly -> 4.5) |
|||
| Line 45: | Line 45: | ||
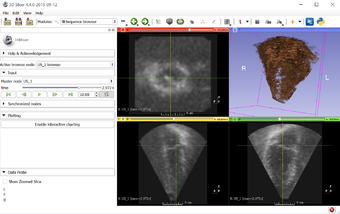
|[[Image:BasicHeartView.png|thumb|340px|Visualization of 4D ultrasound image]] | |[[Image:BasicHeartView.png|thumb|340px|Visualization of 4D ultrasound image]] | ||
|} | |} | ||
| + | |||
| + | |||
| + | == Setup == | ||
| + | * Install Slicer | ||
| + | * Start Slicer, install SlicerHeart extension from the Extensions Manager | ||
| + | * Install the pre-requisite Sequences module when asked | ||
| + | * Restart Slicer | ||
| + | |||
| + | == Patch/convert non-compliant Philips Cartesian 4D US DICOM files == | ||
| + | * Go to Module: Cardiac / Philips 4D US DICOM patcher | ||
| + | * Select the directory where your Philips-exported files are located as ''Input DICOM directory'' | ||
| + | * Select an empty directory as ''Output directory'', output of the conversion/fix operation will be stored there | ||
| + | * Check ''Export to DICOM files'' checkbox if you want to generate corrected DICOM files that can be loaded into standard-compliant DICOM viewers | ||
| + | * Check ''Anonymize DICOM files'' checkbox if you want to remove patient information from the output files | ||
| + | * Check ''Export to NRRD files'' checkbox if you want to store the output in non-DICOM file format | ||
| + | * Click Patch | ||
| + | |||
| + | == Load patched DICOM files == | ||
| + | * Drag-and-drop the directory that contains fixed DICOM files on the Slicer main window | ||
| + | * Slicer will show a popup, keep the default ''Load directory into DICOM database'' option and click OK | ||
| + | * Select ''Copy'' if your data resides on a removable drive or temporary directory; select ''Add link'' if you don't want to make a copy of your files into the Slicer DICOM database (just a link will be added to existing files) | ||
| + | * Click on the patient name of the data that you just imported | ||
| + | * Click ''Load'' to load the data | ||
| + | |||
| + | == Load nrrd files == | ||
| + | * Drag-and-drop the nrrd file on the Slicer main window | ||
| + | * In the displayed ''Add data'' dialog select ''Volume sequence'' in the ''Description'' column | ||
| + | * Click ''OK'' to load the data | ||
| + | |||
| + | == Review loaded 4D ultrasound images == | ||
| + | * When a 4D volume sequence is loaded the sequence browser toolbar is displayed (if not, then right-click the toolbar area and click ''Sequence browser'') | ||
| + | * Select a sequence in the sequence browser toolbar, click play, pause, prev/next frame, etc. to view the sequence | ||
| + | |||
| + | |||
| + | |||
<!-- ---------------------------- --> | <!-- ---------------------------- --> | ||
<!-- | <!-- | ||
Revision as of 20:47, 11 January 2016
Home < Documentation < 4.5 < Extensions < SlicerHeart
|
For the latest Slicer documentation, visit the read-the-docs. |
Introduction and Acknowledgements
- Authors: Andras Lasso (PerkLab), Steve Pieper (Isomics), Adam Rankin (Robarts), Matthew Jolley (CHOP)
- Contacts:
- Andras Lasso, <email>lasso@queensu.ca</email>
- Matthew Jolley, <email>jolleym@email.chop.edu</email>
- Website: https://github.com/SlicerHeart/SlicerHeart
- License: Slicer license
- Download/install: install 3D Slicer, start 3D Slicer, open the Extension Manager, install the Sequences and SlicerHeart extensions
Extension Description
|
Modules
Use Cases
Setup
- Install Slicer
- Start Slicer, install SlicerHeart extension from the Extensions Manager
- Install the pre-requisite Sequences module when asked
- Restart Slicer
Patch/convert non-compliant Philips Cartesian 4D US DICOM files
- Go to Module: Cardiac / Philips 4D US DICOM patcher
- Select the directory where your Philips-exported files are located as Input DICOM directory
- Select an empty directory as Output directory, output of the conversion/fix operation will be stored there
- Check Export to DICOM files checkbox if you want to generate corrected DICOM files that can be loaded into standard-compliant DICOM viewers
- Check Anonymize DICOM files checkbox if you want to remove patient information from the output files
- Check Export to NRRD files checkbox if you want to store the output in non-DICOM file format
- Click Patch
Load patched DICOM files
- Drag-and-drop the directory that contains fixed DICOM files on the Slicer main window
- Slicer will show a popup, keep the default Load directory into DICOM database option and click OK
- Select Copy if your data resides on a removable drive or temporary directory; select Add link if you don't want to make a copy of your files into the Slicer DICOM database (just a link will be added to existing files)
- Click on the patient name of the data that you just imported
- Click Load to load the data
Load nrrd files
- Drag-and-drop the nrrd file on the Slicer main window
- In the displayed Add data dialog select Volume sequence in the Description column
- Click OK to load the data
Review loaded 4D ultrasound images
- When a 4D volume sequence is loaded the sequence browser toolbar is displayed (if not, then right-click the toolbar area and click Sequence browser)
- Select a sequence in the sequence browser toolbar, click play, pause, prev/next frame, etc. to view the sequence
Similar Extensions
- CardiacMRIToolkit: Cardiac MRI toolkit.

