Home < Documentation < Nightly < Extensions < SegmentationWizard
Introduction and Acknowledgements
|
Extension: SegmentationWizard
Acknowledgments:
This work supported in part the National Institutes of Health, National Cancer Institute through the following grants:
- Quantitative Image Informatics for Cancer Research (QIICR) (U24CA180918)
- Quantitative MRI of Glioblastoma Response (U01CA154601)
- Informatics Tools for Optimized Imaging Biomarkers for Cancer Research & Discovery (U24CA180927)
Authors: Andrew Beers (Massachusetts General Hospital)
Contact: Andrew Beers, <email>abeers@mgh.harvard.edu</email>
License: Slicer License
|
| Quantitative Image Informatics for Cancer Research
|
|
|
Module Description
The SegmentationWizard module allows users to quickly create smooth, 3D regions of interest with only a few clicks, and then provides a variety of tools to threshold and refine those regions of interest. The module is broken up into several steps, which the user can progress through with "Back" and "Next" buttons on the bottom of the module panel. The module can be used on single volumes, or on pre- and post-contrast pairs. In the latter case, utilities for registering, normalizing, and subtracting volumes are provided. Check the tutorials section for some usage examples, and send any bugs, comments, or feature requests to abeers@mgh.harvard.edu.
It is our intention to add semi-automatic and automatic segmentation tools based on deep learning and other machine learning methods to this module in the future. Check back in sometime soon!
Use Cases
- Tissue segmentation with and pre- and post-contrast images.
- Intensity thresholding for parametric maps.
- Subtraction map creation and registration.
- Adaptive volume cropping
Tutorials
https://www.youtube.com/watch?v=_7oZygGp2ds&t=13s
Gallery
Creating a subtraction map
Thresholding a Lung CT ROI
Documentation
Step 1. Volume Selection
|
|
- Volume Selection: Choose which image you would like to segment. If you only select one image, steps 2 and 3 (Registration, Normalization, and Subtraction) will be skipped.
|
Step 2. Registration (Optional)
|
|
- Registration Order: Choose which order you would like to register your images to. The moving image will be resampled into the space of the fixed image using Slicer's BRAINSFit registration algorithm.
- Registration Method: Choose which registration method you would like to use. "No Registration" allows you to skip this step. "Rigid Registration" will attempt to rotate and translate the moving image into the space of the fixed image. "Affine Registration" will rotate, translate, scale, and skew the input image. Both affine and rigid registration methods will produce a 3D Slicer Linear Transformation object which you can inspect in the "Transforms" module. "Deformable Registration" will perform deformable BSpline registration on the moving image, and create a BSpline Transform object. In general, each method will be more likely to be accurate but also more time-consuming than the previous method.
- Registration Output: Either create a new volume for the post-registration moving image, or replace the original image. The new volume will have the name "[VolumeName1]_reg_[VolumeName2]".
|
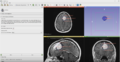
Step 3. Normalization and Subtraction (Optional)
Step 3 Example Subtraction Map
|
- Normalization Methods: Choose the intensity normalization method for your two volumes. This may help to produce better contrast when calculating a subtraction map.
- Normalization Order: Choose whether to normalize pre- to post-contrast, or vice versa.
- Calculate Subtraction Map: Subtract Volume 1 from Volume 2 using Slicer's "Subtract Scalar Volumes" module. The output subtraction volume will be the basis for segmentation in future steps. The output volume's name will be displayed as "[VolumeName2]_subtraction".
|
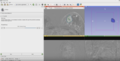
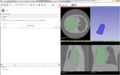
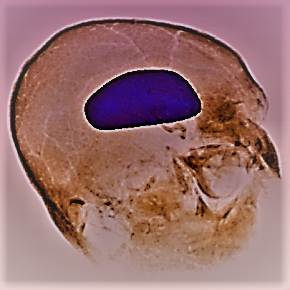
Step 4. ROI
Step 4 Example ROI from Markups
|
- ROI Toolbar: Use the ROI Toolbar to create a smooth, convex segmentation around your region of interest. Use the Model Marker Placement Tool to lay down border points. Once you place more than three border points, a best-guess segmentation will automatically be created from your border points. You can add as many border points as needed, with the segmentation guess automatically adjusting as necessary. You can move existing border points by de-selecting the Model Marker Placement Tool, and clicking and dragging using the basic mouse tool. The model will update accordingly.
- Model-Based ROI: Use this drop-down menu to switch between different sets of markup points. Additional points added with the ROI toolbar will update whichever model is selected in this drop-down menu. Pre-existing sets of points can also be loaded into this menu and turned into the template for a segmentation.
|
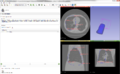
Step 5. Thresholding
Step 5 Example Thresholded ROI
|
- Threshold Range: Adjust this slider to set a simple intensity threshold on the smooth segmentation created in the previous step. Voxels in the newly-created label named "[VolumeName1]_roi_label_thresholded" with intensities outside of the slider's bounds will be erased. The original segmentation without any thresholding is available under a second label named "[VolumeName1]_roi_label", and a version of the original volume cropped to that label is available under the name "[VolumeName1]_roi_cropped".
|
Step 6. Review
|
|
- Editor Tools: Use these tools from Slicer's Editor module to clean up your segmentation. You can also switch to the Editor or Segmentations modules for more label editing options.
- Restart: Remove segmentation objects you no longer need, and go back to Step 1. While you can go back to previous steps via the "Back" buttons, it is recommended that you use the Restart button in this step when segmenting an entirely new volume. This will reset all of the steps back to their original state.
|
Similar Modules
Volume Clip - https://www.slicer.org/wiki/Documentation/Nightly/Extensions/VolumeClip
ChangeTracker - https://www.slicer.org/wiki/Documentation/Nightly/Extensions/ChangeTracker
References
None
Information for Developers
|