Difference between revisions of "Modules:PlastimatchDICOMRT"
| (21 intermediate revisions by the same user not shown) | |||
| Line 5: | Line 5: | ||
{| | {| | ||
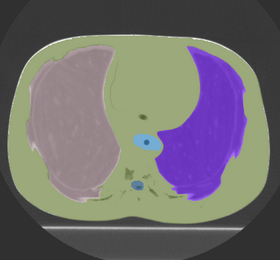
| − | |[[Image: | + | |[[Image:plastimatch_dicomrt_ss.png|thumb|280px|DICOM-RT Structure Set]] |
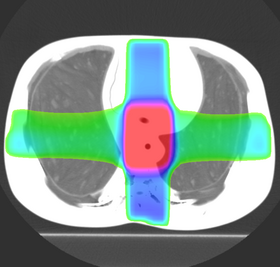
| − | |[[Image: | + | |[[Image:plastimatch_dicomrt_dose.png|thumb|280px|DICOM-RT Dose]] |
|} | |} | ||
| Line 22: | Line 22: | ||
===Module Description=== | ===Module Description=== | ||
| − | This is the DICOM-RT | + | This is the DICOM / DICOM-RT import module. It allows you to select a directory containing DICOM-RT structure sets and/or dose, which it will convert into 3D Slicer labelmap and/or scalar image. This module also loads the DICOM CT image without requiring the need to use the Slicer volume import wizard. |
| + | |||
| + | '''Note''': In a Slicer, a labelmap voxel can only belong to one structure. However, DICOM-RT allows a region to belong to any number of strucutres. Therefore, importing DICOM-RT structure sets as Slicer labelmaps will usually result in a loss of data. This module uses a "last structure wins" strategy for assigning labels to overlapping volumes. | ||
| + | |||
| + | '''Note''': Because DICOM-RT structures are specified as polylines, there is a small loss of fidelity when they are converted into rasterized volumes. | ||
== Usage == | == Usage == | ||
| Line 29: | Line 33: | ||
{| | {| | ||
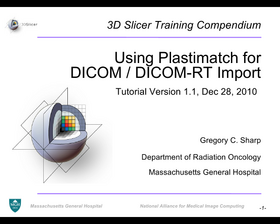
| − | |[[Image: | + | |[[Image:plastimatch_dicomrt_tutorial_ppt.png|thumb|280px|[http://forge.abcd.harvard.edu/gf/download/frsrelease/110/1568/3D_Slicer_Plastimatch_DICOM_RT_Tutorial_2010_12_28.pdf Download tutorial (PDF)]]] |
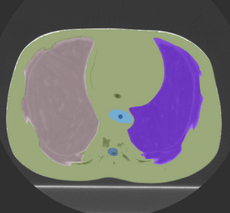
| − | |[[Image: | + | |[[Image:plastimatch_dicomrt_ss.png|thumb|230px|[http://forge.abcd.harvard.edu/gf/download/frsrelease/85/934/chest-phantom-dicomrt-xio-4.33.02.tar.gz (Download tutorial data)]]] |
|} | |} | ||
| Line 39: | Line 43: | ||
| | | | ||
* '''Input/Output panel:''' | * '''Input/Output panel:''' | ||
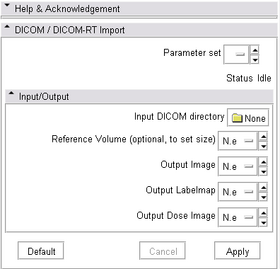
| − | ** ''' | + | ** '''Input DICOM directory:''' Here you choose any file in the directory which contains the DICOM-RT data. |
| − | ** ''' | + | ** '''Reference Volume (to set size):''' This is an optional field. But if your dicom directory does not contain a CT, it is required. Here you choose any loaded volume. The import module will create a labelmap at the same resolution and pixel spacing as the reference volume that you choose here. |
| − | ** '''Output | + | ** '''Output Image:''' Here you choose where to put the output CT image. Unless you want to replace an existing volume, you should choose "Create New Volume". |
| − | + | ** '''Output Labelmap:''' Here you choose where to put the output DICOM-RT structure set labelmap. Unless you want to replace an existing volume, you should choose "Create New Volume". | |
| − | ** ''' | + | ** '''Output Dose Image:''' Here you choose where to put the output DICOM-RT dose image. Unless you want to replace an existing volume, you should choose "Create New Volume". |
| − | + | |[[Image:plastimatch_dicomrt_gui.png|thumb|280px|User Interface]] | |
| − | |||
| − | |||
| − | |||
| − | |||
| − | |||
| − | ** '''Image | ||
| − | |||
| − | |||
| − | |||
| − | |||
| − | |||
| − | |||
| − | |||
| − | |[[Image:plastimatch_dicomrt_gui.png|thumb| | ||
|} | |} | ||
| Line 96: | Line 86: | ||
== More Information == | == More Information == | ||
| + | |||
| + | ===About plastimatch=== | ||
| + | Plastimatch is an open source software for deformable image registration. It is designed for high-performance volumetric registration of medical images, such as X-ray computed tomography (CT), magnetic resonance imaging (MRI), and positron emission tomography (PET). Software features include: | ||
| + | |||
| + | * B-spline method for deformable image registration (GPU and multicore accelerated) | ||
| + | * Demons method for deformable image registration (GPU accelerated) | ||
| + | * ITK-based algorithms for translation, rigid, affine, demons, and B-spline registration | ||
| + | * Pipelined, multi-stage registration framework with seamless conversion between most algorithms and transform types | ||
| + | * Landmark-based deformable registration using thin-plate splines for global registration | ||
| + | * Landmark-based deformable registration using radial basis functions for local corrections | ||
| + | * Broad support for 3D image file formats (using ITK), including Dicom, Nifti, NRRD, MetaImage, and Analyze | ||
| + | * Dicom and DicomRT import and export | ||
| + | * XiO import and export | ||
| + | * Plugins for 3D Slicer | ||
| + | |||
| + | Plastimatch also features two handy utilities which are not directly related to image registration: | ||
| + | |||
| + | * FDK cone-beam CT reconstruction (GPU and multicore accelerated) | ||
| + | * Digitally reconstructed radiograph (DRR) generation (GPU and multicore accelerated) | ||
===Acknowledgment=== | ===Acknowledgment=== | ||
Latest revision as of 16:58, 28 December 2010
Home < Modules:PlastimatchDICOMRTReturn to Slicer 3.6 Documentation
Plastimatch > DICOM-RT Import
General Information
Module Type & Category
Type: CLI
Category: Plastimatch
Authors, Collaborators & Contact
- Authors: See AUTHORS.TXT contained within the package
- Contact: Greg Sharp, Department of Radiation Oncology, Massachusetts General Hospital (gcsharp@partners.org)
- Web page: http://plastimatch.org
Module Description
This is the DICOM / DICOM-RT import module. It allows you to select a directory containing DICOM-RT structure sets and/or dose, which it will convert into 3D Slicer labelmap and/or scalar image. This module also loads the DICOM CT image without requiring the need to use the Slicer volume import wizard.
Note: In a Slicer, a labelmap voxel can only belong to one structure. However, DICOM-RT allows a region to belong to any number of strucutres. Therefore, importing DICOM-RT structure sets as Slicer labelmaps will usually result in a loss of data. This module uses a "last structure wins" strategy for assigning labels to overlapping volumes.
Note: Because DICOM-RT structures are specified as polylines, there is a small loss of fidelity when they are converted into rasterized volumes.
Usage
Tutorials
Quick Tour of Features and Use
|
Development
Notes from the Developer(s)
Developer-oriented documentation is found on the plastimatch web site: http://plastimatch.org
Dependencies
This module has no dependencies.
Tests
Plastimatch features approximately 100 test cases.
Known bugs
Usability issues
Please report usability issues to the bug tracker.
Source code & documentation
We recommended to download the latest source code from subversion:
Documentation:
More Information
About plastimatch
Plastimatch is an open source software for deformable image registration. It is designed for high-performance volumetric registration of medical images, such as X-ray computed tomography (CT), magnetic resonance imaging (MRI), and positron emission tomography (PET). Software features include:
- B-spline method for deformable image registration (GPU and multicore accelerated)
- Demons method for deformable image registration (GPU accelerated)
- ITK-based algorithms for translation, rigid, affine, demons, and B-spline registration
- Pipelined, multi-stage registration framework with seamless conversion between most algorithms and transform types
- Landmark-based deformable registration using thin-plate splines for global registration
- Landmark-based deformable registration using radial basis functions for local corrections
- Broad support for 3D image file formats (using ITK), including Dicom, Nifti, NRRD, MetaImage, and Analyze
- Dicom and DicomRT import and export
- XiO import and export
- Plugins for 3D Slicer
Plastimatch also features two handy utilities which are not directly related to image registration:
- FDK cone-beam CT reconstruction (GPU and multicore accelerated)
- Digitally reconstructed radiograph (DRR) generation (GPU and multicore accelerated)
Acknowledgment
National Institutes of Health
NIH / NCI 6-PO1 CA 21239
Federal share of program income earned by MGH on C06CA059267
Progetto Rocca Foundation
A collaboration between MIT and Politecnico di Milano
References
- G Sharp et al. "Plastimatch - An open source software suite for radiotherapy image processing," Proceedings of the XVIth International Conference on the use of Computers in Radiotherapy, May, 2010.
