Documentation:Nightly:Registration:RegistrationLibrary:RegLib C12a
Slicer Registration Library Case #12a: Liver Tumor Cryoablation (alternate version using nested transforms)
Input

|

|

|
| fixed image/target | moving image |
Description
We have a pre-operative MRI and an intra-operative CT. We wish to align the MRI to the CT to aid in guiding the surgical intervention. Tumor visibility is much better on the MRI, hence a properly registered MRI can help locate the tumor during the intervention.
Approach: we seek a non-rigid registration of the MRI to the CT. Because contrast and image content are very different, we must first build masks to guide the registration process onto the structures of interest. We then obtain the registration in 2 steps: we first compute an affine registration to test stability and feasibility of our masks. Once successful we use this registration as starting point for a BSpline non-rigid transform.
Click here for original version
Modules used
Download (from NAMIC MIDAS)
Why 2 sets of files? The "input data" mrb includes only the unregistered data to try the method yourself from start to finish. The full dataset includes intermediate files and results (transforms, resampled images etc.). If you use the full dataset we recommend to choose different names for the images/results you create yourself to distinguish the old data from the new one you generated yourself.
Video Screencasts
- Movie/screencast showing registration (affine + BSpline) for Case #12a
- Movie/screencast showing visualization of nonrigid transform (part 1: planar grid + 3D)
- Movie/screencast showing visualization of nonrigid transform (part2: 3D contour)
- Movie/screencast showing visualization of nonrigid transform (part 3: 3D view, grid slice only )
Objective / Background
We seek to align a pre-operative MRI with a contrast enhanced CT for surgical guidance.
Keywords
MRI, CT, IGT, intra-operative, liver, cryoablation, change detection, non-rigid registration
Input Data
- reference/fixed : pr-op CT, 0.95 x 0.95 x 5 mm voxel size
- moving: intra-op MRI, 0.78 x 0.78 x 2.5 mm axial,
Procedures
Note that the approach below is different from the original version: here we want to isolate the nonrigid part of the registration from the affine portion, so that we can visualize the deformation only. See the original version if the main interest is the final aligned image.
- Phase I: Build Masks
- Note: for illustration the example set contains 2 masks: one with only the liver and one also including spleen and kidney (Mask2). As shown in the results below, the liver-only mask is insufficiently constraining the registration, yielding a result that at first glance looks ok for the liver, but has significant misalignment in the remaining abdominal area. Hence it is advisable to stabilize the registration further by including more structures with good contrast in both images (Spleen, Kidney).
- open the Editor module
- select "MRI" as the master volume ; a new "MRI_label" is created
- using the Brush tool, trace the liver contour from axial slices. Also include kidneys and spleen.
- repeat the same for the CT.
- you should end up with 2 label maps similar to those included in the example dataset. See snapshots in Result section below.
- save the label maps as "MRI-label.nrrd" or similar
- registration masks ideally extend beyond the structure boundary:
- select the Dilate tool and click Apply 3-4 times to extend the mask area
- repeat for both masks
- In the Editor module, use the Dilate function to expand the outline by 2-3 pixels (click on Apply button 2-3 times)
- save dilated labelmasks under new name (e.g. CT_mask.nrrd)
- Phase II: MR-CTpre registration (Affine)
- open the General Registration (BRAINS) module
- Fixed Image Volume: CT
- Moving Image Volume: MRI
- Output Settings:
- Slicer BSpline Transform": none
- Slicer Linear Transform: create new transform, rename to "Xf1_Affine"
- Output Image Volume: create new volume, rename to "MRI_Xf1" or similar (we use this for ease of validation only)
- Initialization: select the useCenterOfROIAlign
- Registration Phases: check boxes for Rigid , Rigid+Scale and Affine
- Main Parameters: increase Number OF Samples to 300,000
- Mask Option: select ROI button
- (ROI)Masking input fixed: CT_mask2
- (ROI)Masking input moving: MRI_mask2
- Leave all other settings at default
- click: Apply; runtime < 1 min (MacPro QuadCore 2.4GHz)
- this should generate a first alignment.
- Phase III: Prepare for Nonrigid Registration: create Affine aligned volume
- here we want to isolate the deformation portion of the nonrigid registration. We therefore do not (as in the original) case, use the above affine registration as a starting point, but rather create a realigned version that includes this affine transform. We can do this without resampling using the Harden Transform function:
- open the Data module
- if not there already, drag the "MRI" volume node inside the "Xf1_Affine" transform node. You will see a "+" sign appear when dragging, at that point release the mouse to place the volume inside.
- note that the views update (if you have the MRI volume selected in any of the views) immediately when the volume is placed within the transform.
- right-click on the "MRI" node and from the pop-up menu select Harden Transform. This will add the affine transform to the orientation info of the MRI volume and place the volume back on the main level.
- Note that the original MRI volume (orientation) has been overwritten at this point. We recommend to immediately rename the volume to document that fact: double-click on the node and add "_Xf1" or similar to the name.
- We now have a volume in the affine aligned orientation. We use this volume as a starting point for the nonrigid (BSpline) registration
- repeat the above for the mask: drag "MRI_mask" inside the "Xf1_Affine" transform, select Harden Transform and then rename to "MRI_mask_Xf1" or similar.
- Phase IV: Nonrigid Registration
- open the General Registration (BRAINS) module
- Fixed Image Volume: CT
- Moving Image Volume: MRI_Xf1
- Output Settings:
- Slicer BSpline Transform": create new transform, rename to "Xf2_BSplineOnly"
- Slicer Linear Transform: none
- Output Image Volume: none (we use the new dynamic visualization of BSpline transforms to view the result)
- Initialization:
- Initialization Transform: None (remember that MRI_Xf1 is already in the affine-aligned space)
- Initialization Transform Mode: Off
- Registration Phases: check boxes for BSpline only
- Main Parameters:
- Number Of Samples: 300,000
- B-Spline Grid Size: 7,7,3
- Mask Option: select ROI button
- (ROI)Masking input fixed: CT_mask
- (ROI)Masking input moving: MRI_mask_Xf1 (remember to use the aligned mask, not the original one)
- Leave all other settings at default
- click: Apply
- Phase V: Nested Transforms
- We now have the 2 main transforms: "Xf1_Affine" and "Xf2_BSplineOnly". Together they form the full alignment.
- drag the volume "MRI_Xf1" volume into the transform "Xf2_BSplineOnly". You should see the views update immediately.
- to generate a resampled version, you can apply the same function as for the affine transform, i.e. right-click + Harden Transform
- alternatively you can use one of the Resample modules (e.g. BRAINSresample) to generate a resampled version
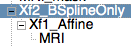
- To nest the transforms:
- reload the original volume "MRI"
- place it inside the "Xf1_Affine" transform
- place the entire "Xf1_Affine" struct (including the MRI volume within) onto the "Xf2_BSplineOnly" transform. Your structure should now look like the image on the right:
- again to resample select "Harden Transform". Note that while hardening a linear (e.g. Affine) transform can be done without resampling, the hardening of nonlinear transforms like a BSpline does require a resampling. Hence you will notice a slight delay before the "MRI" node is placed back onto the main level.
- note that currently only limited combinations of Affine + BSpline nesting are supported, e.g. you cannot (yet) nest multiple BSplines together using this function.

- Phase VI: Transform Visualizer
- significant additions to visualize transforms have been added recently.
- open the Transforms module
- under Active Transforms, select "Xf2_BSplineOnly"
- open the Display tab
- check the Visible in Slice View checkbox.
- under the Colors tab you can control the color coding, and under the Advanced tab you can control size & density, range, icon etc. of the glyphs
- see the demo screencasts above for examples on how to visualize the transform
- note that to visualize a deformation effectively, it should not contain an linear (rigid, affine) portion, because that quickly dominates the field and makes deformations hard to see. That's the main motivation for separating the affine and BSpline transforms the way we did in the above workflow.
Registration Results (click to enlarge)
 |
unregistered MRI & CT |
 |
registration masks |
 |
affine registered MRI & CT |
 |
nonrigid registered MRI & CT |
 |
insufficient mask: nonrigid registered with liver mask only, note the misalignment in the remaining abdomen |
 |
Color overlay of registered MRI onto CT, illustrating the fusion: MRI soft tissue contrast shows substructures & vasculature invisible on the CT |
Acknowledgments
Thanks to Dr.Stuart Silverman and Dr. Nobuhiko Hata for sharing this case.