Difference between revisions of "Modules:EMSegment-TemplateBuilder:EMSegment-TemplateBuilder-Steps"
From Slicer Wiki
| Line 1: | Line 1: | ||
| + | [[Modules:EMSegment-TemplateBuilder|Return to EMSegment Template Builder Documentation]] | ||
| + | |||
= EMSegment Template Builder Workflow Wizard Steps= | = EMSegment Template Builder Workflow Wizard Steps= | ||
| Line 19: | Line 21: | ||
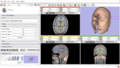
== (4/9) Select Target Images: Choose the set of images that will be segmented == | == (4/9) Select Target Images: Choose the set of images that will be segmented == | ||
| + | [[Image:EMSegment-Workflow-4-9.png|thumb|580px|Step 4/9]] | ||
* To change or add new atlas volumes: Load new volumes into Slicer3, then Select new volumes at this step | * To change or add new atlas volumes: Load new volumes into Slicer3, then Select new volumes at this step | ||
* You can reorder target images; order is important | * You can reorder target images; order is important | ||
| Line 24: | Line 27: | ||
* First target is fixed image | * First target is fixed image | ||
* Rigid, mutual information registration | * Rigid, mutual information registration | ||
| − | |||
<br style="clear:both;"/> | <br style="clear:both;"/> | ||
| Line 35: | Line 37: | ||
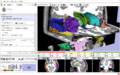
== (6/9) Specify Intensity Distributions: Define intensity distribution for each anatomical structure == | == (6/9) Specify Intensity Distributions: Define intensity distribution for each anatomical structure == | ||
| + | {| | ||
| + | |[[Image:EMSegment-Workflow-6-9.png|thumb|580px|Step 6/9]] | ||
| + | |[[Image:EMSegment-Workflow-6-9-sample.png|thumb|580px|Step 6/9 - Sample Voxels]] | ||
| + | |[[Image:EMSegment-Workflow-6-9-sample-remove.png|thumb|580px|Step 6/9 - Remove Voxels]] | ||
| + | |} | ||
* Intensity distributions define appearance of each leaf structure | * Intensity distributions define appearance of each leaf structure | ||
* Gaussian | * Gaussian | ||
| Line 50: | Line 57: | ||
* Tip: sample first, then fine tune manually | * Tip: sample first, then fine tune manually | ||
| − | |||
| − | |||
| − | |||
| − | |||
| − | |||
| − | |||
<br style="clear:both;"/> | <br style="clear:both;"/> | ||
== (7/9) Edit Node-based Parameters: Specify node-based segmentation parameters == | == (7/9) Edit Node-based Parameters: Specify node-based segmentation parameters == | ||
| + | [[Image:EMSegment-Workflow-7-9.png|thumb|580px|Step 7/9]] | ||
* Segmentation parameters for every tree node | * Segmentation parameters for every tree node | ||
* Influence | * Influence | ||
| Line 66: | Line 68: | ||
** Smoothing (parent nodes only) | ** Smoothing (parent nodes only) | ||
* Stopping Conditions | * Stopping Conditions | ||
| − | |||
<br style="clear:both;"/> | <br style="clear:both;"/> | ||
== (8/9) Edit Registration Parameters: Specify atlas-to-target registration parameters == | == (8/9) Edit Registration Parameters: Specify atlas-to-target registration parameters == | ||
| + | [[Image:EMSegment-Workflow-8-9.png|thumb|580px|Step 8/9]] | ||
* Moving image registered to first target image (You can choose any image loaded into Slicer3) | * Moving image registered to first target image (You can choose any image loaded into Slicer3) | ||
* Same transformation applied to all atlas images before segmentation begins | * Same transformation applied to all atlas images before segmentation begins | ||
| − | |||
<br style="clear:both;"/> | <br style="clear:both;"/> | ||
==(9/9) Run Segmentation: Save work and apply EM Algorithm to segment target images== | ==(9/9) Run Segmentation: Save work and apply EM Algorithm to segment target images== | ||
| + | [[Image:EMSegment-Workflow-9-9.png|thumb|580px|Step 9/9]] | ||
* Select output and run registration | * Select output and run registration | ||
* You can troubleshoot preprocessing by saving intermediate results | * You can troubleshoot preprocessing by saving intermediate results | ||
* Choose an output labelmap | * Choose an output labelmap | ||
* ROI governs segmentation processing (one-based, not zero-based) | * ROI governs segmentation processing (one-based, not zero-based) | ||
| − | |||
| − | |||
<br style="clear:both;"/> | <br style="clear:both;"/> | ||
| Line 106: | Line 106: | ||
Image:EMSegment31Structures.png|Segmentation of brain structures using EMSegmenter | Image:EMSegment31Structures.png|Segmentation of brain structures using EMSegmenter | ||
</gallery> | </gallery> | ||
| + | |||
| + | [[Modules:EMSegment-TemplateBuilder|Return to EMSegment Template Builder Documentation]] | ||
Revision as of 18:05, 19 March 2009
Home < Modules:EMSegment-TemplateBuilder:EMSegment-TemplateBuilder-StepsReturn to EMSegment Template Builder Documentation
Contents
- 1 EMSegment Template Builder Workflow Wizard Steps
- 1.1 (1/9) Define Parameters Set: Select parameter set or create new parameters
- 1.2 (2/9) Define Hierarchy: Define a hierarchy of anatomical structures
- 1.3 (3/9) Assign Atlas: Assign atlases for anatomical structures
- 1.4 (4/9) Select Target Images: Choose the set of images that will be segmented
- 1.5 (5/9) Intensity Normalization: Normalize target images
- 1.6 (6/9) Specify Intensity Distributions: Define intensity distribution for each anatomical structure
- 1.7 (7/9) Edit Node-based Parameters: Specify node-based segmentation parameters
- 1.8 (8/9) Edit Registration Parameters: Specify atlas-to-target registration parameters
- 1.9 (9/9) Run Segmentation: Save work and apply EM Algorithm to segment target images
- 2 Generate EM Segmentation Result Gallery
EMSegment Template Builder Workflow Wizard Steps
(1/9) Define Parameters Set: Select parameter set or create new parameters

* For now, use tutorial set
* Later use this interface to create a new parameter set
(2/9) Define Hierarchy: Define a hierarchy of anatomical structures

* Right click to add or delete nodes
* Label corresponds to eventual voxel values in segmentation result
(3/9) Assign Atlas: Assign atlases for anatomical structures

- To change or add new atlas volumes: Load new volumes into Slicer3, then Select new volumes at this step
(4/9) Select Target Images: Choose the set of images that will be segmented

- To change or add new atlas volumes: Load new volumes into Slicer3, then Select new volumes at this step
- You can reorder target images; order is important
- You can choose to align target images
- First target is fixed image
- Rigid, mutual information registration
(5/9) Intensity Normalization: Normalize target images
- You can choose to normalize target images
- Simple, default strategy
- Default parameter sets available from pulldown

(6/9) Specify Intensity Distributions: Define intensity distribution for each anatomical structure


- Intensity distributions define appearance of each leaf structure
- Gaussian
- Dimensionality equal to number of target images
- Two methods
- Specify mean and covariance manually
- Sample voxels from images
- Load first target image into Slicer3 slicer view
- Choose anatomical structure
- Choose `manual sampling’
- Ctrl-left-click on image to add voxels
- To remove an unwanted sample right-click on it and choose “remove”
- Change back to “manual” mode to tweak distribution
- Tip: sample first, then fine tune manually
(7/9) Edit Node-based Parameters: Specify node-based segmentation parameters

- Segmentation parameters for every tree node
- Influence
- Prior weight relative to other structures
- Atlas
- Input channels
- Smoothing (parent nodes only)
- Stopping Conditions
(8/9) Edit Registration Parameters: Specify atlas-to-target registration parameters

- Moving image registered to first target image (You can choose any image loaded into Slicer3)
- Same transformation applied to all atlas images before segmentation begins
(9/9) Run Segmentation: Save work and apply EM Algorithm to segment target images

- Select output and run registration
- You can troubleshoot preprocessing by saving intermediate results
- Choose an output labelmap
- ROI governs segmentation processing (one-based, not zero-based)
Generate EM Segmentation Result Gallery
- Select the first target volume for display
- Select the segmentation results volume in the Labelmap chooser
- Adjust opacity of the label map
- (Optional) Generate and display surfaces from the segmentation results
- Select the "Model Generation" -> "Model Maker" module
- For "Input Volume", select the $My_Segmentation_Result
- For "Output Directory", create and select $PLAYPEN_DIR/Models
- For "Model Scene File", select $PLAYPEN_DIR/Models.mrml
- Enable "Generate All Models"
- Set "End Label" to the highest label that you produced (e.g., 8 fro the tutorial)
- Enable "Joint Smoothing"
- Click on Apply (this will generate the models and will take approximately 5 minutes)
- Load the models into Slicer (File->Import Scene; select $PLAYPEN_DIR/Models.mrml)
- Use The Models module to manipulate display attributes
EMSegmenter Applied to MR T1 & T2 tutorial data
Segmentation of brain structures using EMSegmenter

