Difference between revisions of "Documentation:Nightly:Registration:RegistrationLibrary:RegLib C41"
(Created page with ' = Slicer Registration Library Case #41: Mouse Brain MRI = === Input === {| style="color:#bbbbbb; " cellpadding="10" cellspacing="0" border="0" |[[Image:RegLib_C41_Thumb1.png|15…') |
|||
| (7 intermediate revisions by the same user not shown) | |||
| Line 1: | Line 1: | ||
| + | [[Documentation/Nightly/Registration/RegistrationLibrary|Back to Registration Library]] <br> | ||
= Slicer Registration Library Case #41: Mouse Brain MRI = | = Slicer Registration Library Case #41: Mouse Brain MRI = | ||
| Line 12: | Line 13: | ||
|} | |} | ||
| − | == Modules | + | == Modules used == |
| + | *[[Documentation/Nightly/Modules/Transforms| ''Transforms'']] : to fix the image coordinate system / orientation issue | ||
| + | *[[Documentation/Nightly/Modules/N4ITKBiasFieldCorrection| ''N4ITKBiasFieldCorrection'']]: to correct for local intensity inhomogeneity | ||
| + | *[[Documentation/Nightly/Modules/Editor| ''Editor'']]: to build masks for registration | ||
| + | *[[Documentation/Nightly/Modules/BRAINSFit| ''General Registration (BRAINS)'']]: for affine and nonrigid registration | ||
== Description == | == Description == | ||
| − | Aim is to register the two brains of control mice to eachother. | + | Aim is to register the two brains of control mice to eachother. The original images have their header orientation info in a nonstandard form. As a consequence the image loads with sagittal and axial views switched. To fix we create a reorientation transformAlso the target image content is of low intensity and small compared to the surrounding tissue, making masking essential. We will first correct the orientation issue and apply intensity bias correction, then build two masks for registration, and finally co-register the two images in two steps via affine and non-rigid BSpline transforms. |
| − | + | == Download (from NAMIC MIDAS) == | |
| − | + | <small>''Why 2 sets of files? The "input data" mrb includes only the unregistered data to try the method yourself from start to finish. The full dataset includes intermediate files and results (transforms, resampled images etc.). If you use the full dataset we recommend to choose different names for the images/results you create yourself to distinguish the old data from the new one you generated yourself. ''</small> | |
| − | + | *[http://slicer.kitware.com/midas3/download/?items=119689 '''RegLib_C41.mrb''': input data only, use this to run the tutorial from the start <small>(Slicer mrb file. 32 MB). </small>] | |
| − | * | + | *[http://slicer.kitware.com/midas3/download/?items=119688 '''RegLib_C41_full.mrb''': includes raw data + all solutions and intermediate files, use to browse/verify <small>(Slicer mrb file. 97 MB). </small>] |
| − | |||
== Keywords == | == Keywords == | ||
| Line 30: | Line 34: | ||
*moving MRI: 0.1 x 0.1 x 0.1 mm, 192 x 256 x 192 | *moving MRI: 0.1 x 0.1 x 0.1 mm, 192 x 256 x 192 | ||
| − | == | + | == Video Screencasts == |
| − | + | #[[Media:RegLib_C41_1_BiasCorrection.mov|Movie/screencast showing bias correction step]] | |
| − | + | #[[Media:RegLib_C41_2_RASfix.mov|Movie/screencast showing reorientation to RAS standard space]] | |
| − | + | #[[Media:RegLib_C41_3_BuildMask1.mov|Movie/screencast showing building a registration mask for image 1]] | |
| + | #[[Media:RegLib_C41_3_BuildMask2.mov|Movie/screencast showing building a registration mask for image 2]] | ||
| + | #[[Media:RegLib_C41_4_Register.mov|Movie/screencast showing affine+nonrigid registration step]] | ||
== Procedure == | == Procedure == | ||
| − | + | #'''Reorient to RAS space''': ([[Media:RegLib_C41_2_RASfix.mov|Movie/screencast for this step]]) | |
| − | + | ##go to the [[Documentation/Nightly/Modules/Data| ''Data'']] module | |
| − | # | + | ###right click on the "Scene" node and select "Insert Transform" from the pulldown menu |
| − | # | + | ###rename the new transform to "Xf0_reorient" or similar. |
| − | # | + | ###place/drag both images inside the transform node. |
| − | #place/drag | + | ##go to the [[Documentation/Nightly/Modules/Transforms| ''Transforms'']] ' module & select "Xf0_reorient" from the menu |
| − | #go to the ''Transforms'' module & select "Xf0_reorient" from the menu | + | ###change the identity matrix as shown in the image here. To modify an entry, double-click the field, then edit and to confirm hit the ENTER key.[[Image:RegLib_C41_Reorient_transform.png|150px|lleft|transform to reorient volumes to RAS space]] |
| − | #change the identity matrix as shown in the image | + | ###switch the "1" in the 1st and last row to the last and first column, respectively. Change the sign of the "1" in the middle row to "-1" |
| − | # | + | ###you should see the images in the position as shown in the results below, with the eyes looking up in the axial (red) and left in the sagittal (yellow) view. |
| − | #save | + | ##save intermediate results |
| − | + | #'''Bias Correction''': Correct for local intensity inhomogeneities ([[Media:RegLib_C41_1_BiasCorrection.mov|Movie/screencast for this step]]) | |
| − | + | ##Open the [[Documentation/Nightly/Modules/Editor| ''Editor'']] module (we first build a rough mask for better filtering results) | |
| − | + | ###select "mouse1" as input image, accept the default colormap settings. | |
| − | + | ###select the "Threshold" tool. [[Image:ThresholdEffectIcon.png|30px]]. | |
| − | # | + | ###drag the left side of the threshold range slider until most of the brain is included. Then click "Apply" |
| − | # | + | ###select the "Dilate" tool. Click the "Apply" button 2-3 times until the mask encloses all of the brain and a bit beyond |
| − | + | ###repeat for the "mouse2" image | |
| − | + | ##Open the [[Documentation/Nightly/Modules/N4ITKBiasFieldCorrection| ''N4ITK MRI Bias Correction'']] module (under ''Filters'' menu) | |
| − | + | ###Input Image: "mouse1" | |
| − | # | + | ###Mask Image: "mouse1-label" image generated above |
| − | + | ###Output Volume: create & rename new: "mouse1_N4" | |
| − | # | + | ###Number of iterations: reduce to 200,150,100 |
| − | # | + | ###leave remaining parameters at defaults |
| − | + | ###Apply. This will take 1-2 minutes to process, depending on CPU | |
| − | # | + | ##repeat for the "mouse2" image. Same settings |
| − | # | + | ##save intermediate results |
| − | + | #''Build Registration Masks''': we now rebuild masks for the registration. You could also use the masks generated above, but we will generate more accurate ones with relatively little effort. Note that registration masks need not be overly accurate but should include the main boundaries of the structure of interest, in this case the brain. We seek a method that will let us generate such a mask quickly and without excessive manual editing. ([[Media:RegLib_C41_3_BuildMask1.mov|Movie/screencast for this step]]) | |
| − | + | ##Open the [[Documentation/Nightly/Modules/Editor| ''Editor'']] module (we first build a rough mask for better filtering results) | |
| − | + | ###select "mouse1" as input image, accept the default colormap settings. Create a new label map (do not use the one already generated above) | |
| − | #repeat for the | + | ###select the "Magic Wand" tool. [[Image:MagicWandEffectIcon.png|30px]]. |
| − | + | ###change the default tolerance and size limits to: 800 and 8000, respectively | |
| − | + | ###check the "Fill Volume" checkbox to apply the effect in 3D. | |
| − | + | ###left click inside the brain in any of the 3 views. Wait a few seconds for the effect to run and the display to update. You will see speckled segmentation overlay being added for each click. Do not worry about the speckled nature of the result at this point, we will fix that later. What we want is points to cover largely the extent of the brain in all dimensions. Use all 3 views to place seeds. See the screencast for details. Once you have most of the brain covered, proceed with next step below. | |
| − | + | ###select the "Dilate" tool [[Image:DilateEffectIcon.png|30px]]. Click the "Apply" button 2-3 times until the mask closes the gaps and encloses all of the brain and a bit beyond | |
| − | ## | + | ###repeat for the "mouse2" image: ([[Media:RegLib_C41_3_BuildMask2.mov|Movie/screencast for this step]]) |
| − | ## | + | #'''Affine Registration''': open the [[Documentation/Nightly/Modules/BRAINSFit|''General Registration (BRAINS)'' module]]. ([[Media:RegLib_C41_4_Register.mov|Movie/screencast for this step]]) |
| − | # | + | ##''Input Images: Fixed Image Volume'': mouse1_N4 |
| − | ##Output | + | ##''Input Images: Moving Image Volume'': mouse2_N4 |
| − | ## | + | ##''Output Settings'': |
| − | ## | + | ###''Slicer Linear Transform'' (create new transform, rename to: "Xf1_Affine") |
| − | ## | + | ###''Output Image Volume'' none. No resampling required for linear transforms |
| − | ## | + | ##''Registration Phases'': select/check ''Rigid'' , ''Rigid+Scale'', ''Affine'' |
| − | ## | + | ##''Main Parameters'': |
| − | # | + | ###increase ''Number Of Samples'' to 200,000 |
| − | |||
| − | |||
| − | ## | ||
| − | ## | ||
| − | ## | ||
| − | ## | ||
| − | |||
| − | ##Output Image Volume | ||
| − | ##Registration | ||
| − | |||
##Leave all other settings at default | ##Leave all other settings at default | ||
| + | ##click: ''Apply''; runtime < 1 min. | ||
| + | #'''BSpline Registration''': open the [[Documentation/Nightly/Modules/BRAINSFit|''General Registration (BRAINS)'' module]] | ||
| + | ##Fixed Image: "mouse1_N4" , Moving Image: "mouse2_N4" | ||
| + | ##Registration phases: from ''Initialize with previously generated transform', select the"Xf1_Affine" node created before. | ||
| + | ##Registration phases: uncheck rigid,scale and affine boxes and check box for ''BSpline'' only. | ||
| + | ##Output: Slicer Linear transform: select "None" | ||
| + | ##Output: Slicer BSpline transform: create new, rename to "Xf2_BSpline" | ||
| + | ##Output Image Volume: create new, rename to "mouse2_Xf2"; ''Pixel Type'': "short" | ||
| + | ##Registration Parameters: increase ''Number Of Samples'' to 300,000; ''Number of Grid Subdivisions'': 5,5,5 | ||
| + | ##Control Of Mask Processing Tab: check ''ROI'' box, for ''Input Fixed Mask'' and ''Input Moving Mask'' select the two masks generated above | ||
| + | ##Leave other settings at default | ||
##click apply | ##click apply | ||
| − | |||
=== Registration Results=== | === Registration Results=== | ||
shown are, from left to right, panels of '''axial''', '''sagittal''' and '''coronal''' views. <br> | shown are, from left to right, panels of '''axial''', '''sagittal''' and '''coronal''' views. <br> | ||
| − | [[Image: | + | [[Image:RegLib_C41_original.png|500px|original brain in non-RAS orientation]] original, not RAS<br> |
| − | [[Image: | + | [[Image: RegLib_C41_RASoriented.png |500px|original brain in proper RAS orientation]] original,after reorientation into RAS<br> |
---- | ---- | ||
| − | [[Image: | + | [[Image:RegLib_C41_unregistered.gif|500px|original unregistered brains]] original, not registered<br> |
| − | [[Image: | + | [[Image:RegLib_C41_registered_Affine.gif|500px| affine registered brains]] affine registered<br> |
| − | [[Image: | + | [[Image:RegLib_C41_registered_BSpline.gif|500px|registered brains after 5x5x5 nonrigid BSpline alignment]] registered brains after 5x5x5 nonrigid BSpline alignment<br> |
| − | |||
<br> | <br> | ||
| + | |||
=== Acknowledgments === | === Acknowledgments === | ||
Many thanks to ''Lili X. Cai'' from the [http://web.mit.edu/jasanofflab/ Jasanoff Laboratory at MIT] for sharing the Data and registration problem. | Many thanks to ''Lili X. Cai'' from the [http://web.mit.edu/jasanofflab/ Jasanoff Laboratory at MIT] for sharing the Data and registration problem. | ||
Latest revision as of 16:23, 2 October 2013
Home < Documentation:Nightly:Registration:RegistrationLibrary:RegLib C41Contents
Slicer Registration Library Case #41: Mouse Brain MRI
Input

|

|

|
| fixed image 1/target MRI mouse #1 |
moving image MRI mouse #2 |
Modules used
- Transforms : to fix the image coordinate system / orientation issue
- N4ITKBiasFieldCorrection: to correct for local intensity inhomogeneity
- Editor: to build masks for registration
- General Registration (BRAINS): for affine and nonrigid registration
Description
Aim is to register the two brains of control mice to eachother. The original images have their header orientation info in a nonstandard form. As a consequence the image loads with sagittal and axial views switched. To fix we create a reorientation transformAlso the target image content is of low intensity and small compared to the surrounding tissue, making masking essential. We will first correct the orientation issue and apply intensity bias correction, then build two masks for registration, and finally co-register the two images in two steps via affine and non-rigid BSpline transforms.
Download (from NAMIC MIDAS)
Why 2 sets of files? The "input data" mrb includes only the unregistered data to try the method yourself from start to finish. The full dataset includes intermediate files and results (transforms, resampled images etc.). If you use the full dataset we recommend to choose different names for the images/results you create yourself to distinguish the old data from the new one you generated yourself.
- RegLib_C41.mrb: input data only, use this to run the tutorial from the start (Slicer mrb file. 32 MB).
- RegLib_C41_full.mrb: includes raw data + all solutions and intermediate files, use to browse/verify (Slicer mrb file. 97 MB).
Keywords
MRI, brain, mouse, masking, non-human, non-rigid,
Input Data
- reference/fixed MRI: 0.1 x 0.1 x 0.1 mm, 192 x 256 x 192
- moving MRI: 0.1 x 0.1 x 0.1 mm, 192 x 256 x 192
Video Screencasts
- Movie/screencast showing bias correction step
- Movie/screencast showing reorientation to RAS standard space
- Movie/screencast showing building a registration mask for image 1
- Movie/screencast showing building a registration mask for image 2
- Movie/screencast showing affine+nonrigid registration step
Procedure
- Reorient to RAS space: (Movie/screencast for this step)
- go to the Data module
- right click on the "Scene" node and select "Insert Transform" from the pulldown menu
- rename the new transform to "Xf0_reorient" or similar.
- place/drag both images inside the transform node.
- go to the Transforms ' module & select "Xf0_reorient" from the menu
- change the identity matrix as shown in the image here. To modify an entry, double-click the field, then edit and to confirm hit the ENTER key.
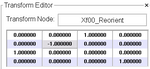
- switch the "1" in the 1st and last row to the last and first column, respectively. Change the sign of the "1" in the middle row to "-1"
- you should see the images in the position as shown in the results below, with the eyes looking up in the axial (red) and left in the sagittal (yellow) view.
- change the identity matrix as shown in the image here. To modify an entry, double-click the field, then edit and to confirm hit the ENTER key.
- save intermediate results
- go to the Data module
- Bias Correction: Correct for local intensity inhomogeneities (Movie/screencast for this step)
- Open the Editor module (we first build a rough mask for better filtering results)
- select "mouse1" as input image, accept the default colormap settings.
- select the "Threshold" tool.
 .
. - drag the left side of the threshold range slider until most of the brain is included. Then click "Apply"
- select the "Dilate" tool. Click the "Apply" button 2-3 times until the mask encloses all of the brain and a bit beyond
- repeat for the "mouse2" image
- Open the N4ITK MRI Bias Correction module (under Filters menu)
- Input Image: "mouse1"
- Mask Image: "mouse1-label" image generated above
- Output Volume: create & rename new: "mouse1_N4"
- Number of iterations: reduce to 200,150,100
- leave remaining parameters at defaults
- Apply. This will take 1-2 minutes to process, depending on CPU
- repeat for the "mouse2" image. Same settings
- save intermediate results
- Open the Editor module (we first build a rough mask for better filtering results)
- Build Registration Masks': we now rebuild masks for the registration. You could also use the masks generated above, but we will generate more accurate ones with relatively little effort. Note that registration masks need not be overly accurate but should include the main boundaries of the structure of interest, in this case the brain. We seek a method that will let us generate such a mask quickly and without excessive manual editing. (Movie/screencast for this step)
- Open the Editor module (we first build a rough mask for better filtering results)
- select "mouse1" as input image, accept the default colormap settings. Create a new label map (do not use the one already generated above)
- select the "Magic Wand" tool.
 .
. - change the default tolerance and size limits to: 800 and 8000, respectively
- check the "Fill Volume" checkbox to apply the effect in 3D.
- left click inside the brain in any of the 3 views. Wait a few seconds for the effect to run and the display to update. You will see speckled segmentation overlay being added for each click. Do not worry about the speckled nature of the result at this point, we will fix that later. What we want is points to cover largely the extent of the brain in all dimensions. Use all 3 views to place seeds. See the screencast for details. Once you have most of the brain covered, proceed with next step below.
- select the "Dilate" tool
 . Click the "Apply" button 2-3 times until the mask closes the gaps and encloses all of the brain and a bit beyond
 - repeat for the "mouse2" image: (Movie/screencast for this step)
- Open the Editor module (we first build a rough mask for better filtering results)
- Affine Registration: open the General Registration (BRAINS) module. (Movie/screencast for this step)
- Input Images: Fixed Image Volume: mouse1_N4
- Input Images: Moving Image Volume: mouse2_N4
- Output Settings:
- Slicer Linear Transform (create new transform, rename to: "Xf1_Affine")
- Output Image Volume none. No resampling required for linear transforms
- Registration Phases: select/check Rigid , Rigid+Scale, Affine
- Main Parameters:
- increase Number Of Samples to 200,000
- Leave all other settings at default
- click: Apply; runtime < 1 min.
- BSpline Registration: open the General Registration (BRAINS) module
- Fixed Image: "mouse1_N4" , Moving Image: "mouse2_N4"
- Registration phases: from Initialize with previously generated transform', select the"Xf1_Affine" node created before.
- Registration phases: uncheck rigid,scale and affine boxes and check box for BSpline only.
- Output: Slicer Linear transform: select "None"
- Output: Slicer BSpline transform: create new, rename to "Xf2_BSpline"
- Output Image Volume: create new, rename to "mouse2_Xf2"; Pixel Type: "short"
- Registration Parameters: increase Number Of Samples to 300,000; Number of Grid Subdivisions: 5,5,5
- Control Of Mask Processing Tab: check ROI box, for Input Fixed Mask and Input Moving Mask select the two masks generated above
- Leave other settings at default
- click apply

Registration Results
shown are, from left to right, panels of axial, sagittal and coronal views.
 original, not RAS
 original,after reorientation into RAS
 original, not registered
 affine registered
 registered brains after 5x5x5 nonrigid BSpline alignment
Acknowledgments
Many thanks to Lili X. Cai from the Jasanoff Laboratory at MIT for sharing the Data and registration problem.