Difference between revisions of "Documentation/Nightly/Report a problem/UploadData"
(Created page with 'This document presents the steps allowing to share and associate a dataset with an issue. '''1'''. Create an account on our dedicated server: http://slicer.kitware.com/ '''2''…') |
(Prepend documentation/versioncheck template. See http://na-mic.org/Mantis/view.php?id=2887) |
||
| (16 intermediate revisions by one other user not shown) | |||
| Line 1: | Line 1: | ||
| + | <noinclude>{{documentation/versioncheck}}</noinclude> | ||
This document presents the steps allowing to share and associate a dataset with an issue. | This document presents the steps allowing to share and associate a dataset with an issue. | ||
| − | + | __TOC__ | |
| + | == Create account == | ||
| + | '''1'''. If not yet done, create an account on our dedicated server: http://slicer.kitware.com/ by clicking on "Register" in the upper right corner. | ||
| + | |||
| + | |||
| + | == Create directory structure == | ||
'''2'''. Create the following structure in your user public folder clicking on the "Create new folder" link | '''2'''. Create the following structure in your user public folder clicking on the "Create new folder" link | ||
| Line 11: | Line 17: | ||
| + | |||
| + | == Upload options == | ||
'''3'''. There are now two options: | '''3'''. There are now two options: | ||
| + | === Archive === | ||
'''3.1'''. Create and upload a TGZ archive. | '''3.1'''. Create and upload a TGZ archive. | ||
| − | <gallery widths=330px heights=220px perrow=2 | + | <gallery widths=330px heights=220px perrow=3> |
| − | File:Slicer-Issue-Upload-data-to-midas 2 TGZ archive.png|'''Step | + | File:Slicer-Issue-Upload-data-to-midas 2.png|'''Step 1''': Select the "Issues" folder and click on "Upload here". |
| − | File:Slicer-Issue-Upload-data-to-midas 3 TGZ archive.png|'''Step | + | File:Slicer-Issue-Upload-data-to-midas 2 TGZ archive.png|'''Step 2''': Select TGZ archive named after your issue (1), choose a license (2) and click on Upload (3). Archive should be named after the issue. <br><small>For example: 2873-GrowCut-FailingTestCase.tar.gz</small> |
| − | File:Slicer-Issue-Upload-data-to-midas 4 TGZ archive.png|'''Step | + | File:Slicer-Issue-Upload-data-to-midas 3 TGZ archive.png|'''Step 3''': After selecting the upload item, click on "View" |
| − | File:Slicer-Issue-Upload-data-to-midas 5 TGZ archive.png|'''Step | + | File:Slicer-Issue-Upload-data-to-midas 4 TGZ archive.png|'''Step 4''': Then click on "Edit" |
| + | File:Slicer-Issue-Upload-data-to-midas 5 TGZ archive.png|'''Step 5''': Update the description entering a link to the issue.<br> <small>For example: {{pre2|scroll|<nowiki>See <a href="http://www.na-mic.org/Bug/view.php?id=2873">http://www.na-mic.org/Bug/view.php?id=2873</a></nowiki>}}</small> | ||
</gallery> | </gallery> | ||
| + | {{ombox|text = An example of archive: http://slicer.kitware.com/midas3/item/13829}} | ||
| + | |||
| + | |||
| + | === Folder === | ||
'''3.2'''. Upload a folder containing all the data. | '''3.2'''. Upload a folder containing all the data. | ||
| − | <gallery widths=330px heights=220px perrow= | + | <gallery widths=330px heights=220px perrow=3> |
| − | File:Slicer-Issue-Upload-data-to-midas 2 folder.png|'''Step | + | File:Slicer-Issue-Upload-data-to-midas 2.png|'''Step 1''': Select the "Issues" folder and click on "Upload here". |
| − | File:Slicer-Issue-Upload-data-to-midas | + | File:Slicer-Issue-Upload-data-to-midas 3 folder.png|'''Step 2''': Click on "Upload folder" |
| − | + | File:Slicer-Issue-Upload-data-to-midas 4 folder.png|'''Step 3''': Click on "Browse" and select folder (1), choose a license (2) and click on "Start Upload" (3) | |
| − | + | File:Slicer-Issue-Upload-data-to-midas 5 folder.png|'''Step 4''': After selecting the created folder, click on "Edit" | |
| − | + | File:Slicer-Issue-Upload-data-to-midas 6 folder.png|'''Step 5''': Enter name (1), description (2) and click on "Save".<br><small>For example:<br>Name: 2873-GrowCut-FailingTestCase<br>Description: {{pre2|scroll|<nowiki>See <a href="http://www.na-mic.org/Bug/view.php?id=2873">http://www.na-mic.org/Bug/view.php?id=2873</a></nowiki>}}</small> | |
</gallery> | </gallery> | ||
| + | |||
| + | {{ombox|text = An example of folder: http://slicer.kitware.com/midas3/folder/918}} | ||
| + | |||
| + | |||
| + | == Share download link == | ||
| + | '''4'''. Reference the data in the issue tracker | ||
| + | |||
| + | === Uploaded archive === | ||
| + | <gallery widths=400px heights=220px perrow=2> | ||
| + | File:Slicer-Issue-Upload-data-to-midas share archive.png|'''Step 1''': Select the uploaded archive (1), click on "Share" (2) and copy the download link (3). | ||
| + | File:Slicer-Issue-Upload-data-to-midas share archive 2.png|'''Step 2''': Reference download link in the "Steps to reproduce" | ||
| + | </gallery> | ||
| + | |||
| + | === Uploaded folder === | ||
| + | <gallery widths=400px heights=220px perrow=2> | ||
| + | File:Slicer-Issue-Upload-data-to-midas share folder.png|'''Step 1''': Select the uploaded folder (1), click on "Share" (2) and copy the download link (3). | ||
| + | File:Slicer-Issue-Upload-data-to-midas share folder 2.png|'''Step 2''': Reference download link in the "Steps to reproduce" | ||
| + | </gallery> | ||
| + | |||
| + | |||
| + | == Remarks == | ||
| + | |||
| + | The process could be streamlined and simplified by for example ... | ||
| + | * ... customizing Mantis so that it exposes an additional upload field that would upload the data to midas | ||
| + | or | ||
| + | * ... enhance Midas so that if a mantis issue is referenced in description, a note is automatically added on mantis | ||
| + | or | ||
| + | ... <your idea> | ||
Latest revision as of 08:04, 14 June 2013
Home < Documentation < Nightly < Report a problem < UploadData
|
For the latest Slicer documentation, visit the read-the-docs. |
This document presents the steps allowing to share and associate a dataset with an issue.
Contents
Create account
1. If not yet done, create an account on our dedicated server: http://slicer.kitware.com/ by clicking on "Register" in the upper right corner.
Create directory structure
2. Create the following structure in your user public folder clicking on the "Create new folder" link
Create the directory structure
Public/NA-MIC/Slicer/Issuesclicking on the "Create new folder" link.

Upload options
3. There are now two options:
Archive
3.1. Create and upload a TGZ archive.
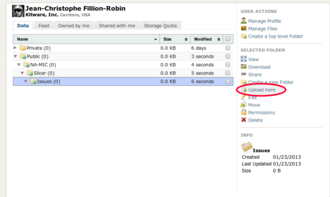
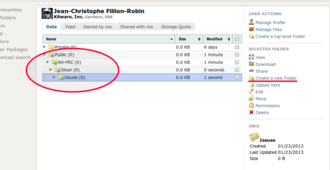
Step 1: Select the "Issues" folder and click on "Upload here".
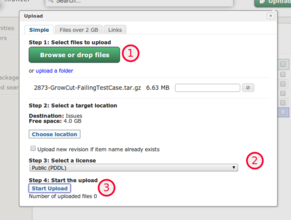
Step 2: Select TGZ archive named after your issue (1), choose a license (2) and click on Upload (3). Archive should be named after the issue.
For example: 2873-GrowCut-FailingTestCase.tar.gz
Step 3: After selecting the upload item, click on "View"
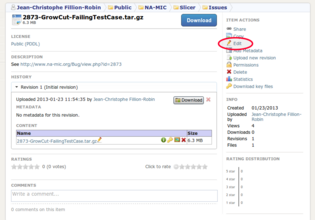
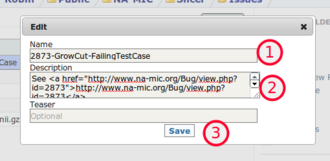
Step 4: Then click on "Edit"
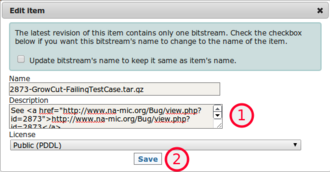 Step 5: Update the description entering a link to the issue.
For example:See <a href="http://www.na-mic.org/Bug/view.php?id=2873">http://www.na-mic.org/Bug/view.php?id=2873</a>


|
|
An example of archive: http://slicer.kitware.com/midas3/item/13829 |
Folder
3.2. Upload a folder containing all the data.
Step 1: Select the "Issues" folder and click on "Upload here".
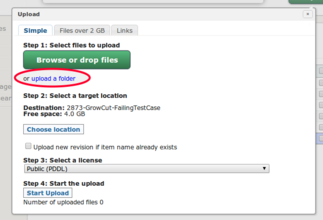
Step 2: Click on "Upload folder"
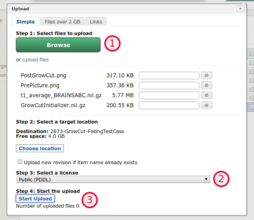
Step 3: Click on "Browse" and select folder (1), choose a license (2) and click on "Start Upload" (3)
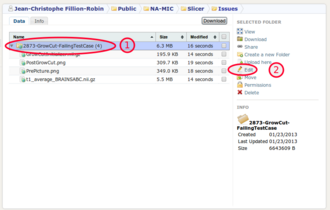
Step 4: After selecting the created folder, click on "Edit"
 Step 5: Enter name (1), description (2) and click on "Save".
For example:
Name: 2873-GrowCut-FailingTestCase
Description:See <a href="http://www.na-mic.org/Bug/view.php?id=2873">http://www.na-mic.org/Bug/view.php?id=2873</a>


|
|
An example of folder: http://slicer.kitware.com/midas3/folder/918 |
4. Reference the data in the issue tracker
Uploaded archive
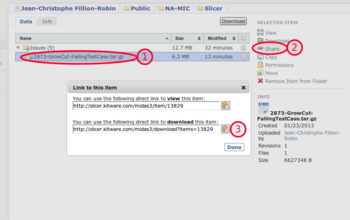
Step 1: Select the uploaded archive (1), click on "Share" (2) and copy the download link (3).
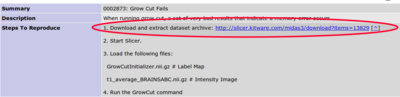
Step 2: Reference download link in the "Steps to reproduce"


Uploaded folder
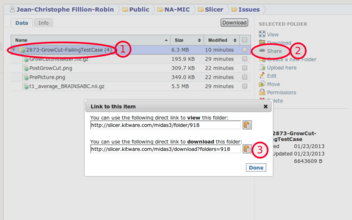
Step 1: Select the uploaded folder (1), click on "Share" (2) and copy the download link (3).
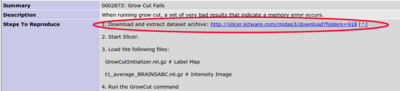
Step 2: Reference download link in the "Steps to reproduce"


Remarks
The process could be streamlined and simplified by for example ...
- ... customizing Mantis so that it exposes an additional upload field that would upload the data to midas
or
- ... enhance Midas so that if a mantis issue is referenced in description, a note is automatically added on mantis
or
... <your idea>