Difference between revisions of "Documentation/Nightly/Report a problem/UploadData"
(Created page with 'This document presents the steps allowing to share and associate a dataset with an issue. '''1'''. Create an account on our dedicated server: http://slicer.kitware.com/ '''2''…') |
m |
||
| Line 2: | Line 2: | ||
| − | '''1'''. | + | '''1'''. If not yet done, create an account on our dedicated server: http://slicer.kitware.com/ by clicking on "Register" in the upper right corner. |
'''2'''. Create the following structure in your user public folder clicking on the "Create new folder" link | '''2'''. Create the following structure in your user public folder clicking on the "Create new folder" link | ||
| Line 15: | Line 15: | ||
'''3.1'''. Create and upload a TGZ archive. | '''3.1'''. Create and upload a TGZ archive. | ||
| − | <gallery widths=330px heights=220px perrow=2 | + | <gallery widths=330px heights=220px perrow=3> |
| − | File:Slicer-Issue-Upload-data-to-midas 2 TGZ archive.png|'''Step | + | File:Slicer-Issue-Upload-data-to-midas 2.png|'''Step 1''': Select the "Issues" folder and click on "Upload here". |
| − | File:Slicer-Issue-Upload-data-to-midas 3 TGZ archive.png|'''Step | + | File:Slicer-Issue-Upload-data-to-midas 2 TGZ archive.png|'''Step 2''': Select TGZ archive named after your issue (1), choose a license (2) and click on Upload (3). Archive should be named after the issue. <br><small>For example: 2873-GrowCut-FailingTestCase.tar.gz</small> |
| − | File:Slicer-Issue-Upload-data-to-midas 4 TGZ archive.png|'''Step | + | File:Slicer-Issue-Upload-data-to-midas 3 TGZ archive.png|'''Step 3''': After selecting the upload item, click on "View" |
| − | File:Slicer-Issue-Upload-data-to-midas 5 TGZ archive.png|'''Step | + | File:Slicer-Issue-Upload-data-to-midas 4 TGZ archive.png|'''Step 4''': Then click on "Edit" |
| + | File:Slicer-Issue-Upload-data-to-midas 5 TGZ archive.png|'''Step 5''': Update the description entering a link to the issue.<br> <small>For example: {{pre2|scroll|<nowiki>See <a href="http://www.na-mic.org/Bug/view.php?id=2873">http://www.na-mic.org/Bug/view.php?id=2873</a></nowiki>}}</small> | ||
</gallery> | </gallery> | ||
| + | |||
| + | |||
| + | {{ombox|text = An example of archive: http://slicer.kitware.com/midas3/item/13816}} | ||
| + | |||
'''3.2'''. Upload a folder containing all the data. | '''3.2'''. Upload a folder containing all the data. | ||
| − | <gallery widths=330px heights=220px perrow= | + | <gallery widths=330px heights=220px perrow=3> |
| − | File:Slicer-Issue-Upload-data-to-midas 2 folder.png|'''Step | + | File:Slicer-Issue-Upload-data-to-midas 2.png|'''Step 1''': Select the "Issues" folder and click on "Upload here". |
| − | File:Slicer-Issue-Upload-data-to-midas | + | File:Slicer-Issue-Upload-data-to-midas 3 folder.png|'''Step 2''': Click on "Upload folder" |
| − | + | File:Slicer-Issue-Upload-data-to-midas 4 folder.png|'''Step 3''': Click on "Browse" and select folder (1), choose a license (2) and click on "Start Upload" (3) | |
| − | + | File:Slicer-Issue-Upload-data-to-midas 5 folder.png|'''Step 4''': After selecting the created folder, click on "Edit" | |
| − | + | File:Slicer-Issue-Upload-data-to-midas 6 folder.png|'''Step 5''': Enter name (1), description (2) and click on "Save".<br><small>For example:<br>Name: 2873-GrowCut-FailingTestCase<br>Description: {{pre2|scroll|<nowiki>See <a href="http://www.na-mic.org/Bug/view.php?id=2873">http://www.na-mic.org/Bug/view.php?id=2873</a></nowiki>}}</small> | |
</gallery> | </gallery> | ||
| + | |||
| + | {{ombox|text = An example of folder: http://slicer.kitware.com/midas3/folder/917}} | ||
Revision as of 20:39, 23 January 2013
Home < Documentation < Nightly < Report a problem < UploadDataThis document presents the steps allowing to share and associate a dataset with an issue.
1. If not yet done, create an account on our dedicated server: http://slicer.kitware.com/ by clicking on "Register" in the upper right corner.
2. Create the following structure in your user public folder clicking on the "Create new folder" link
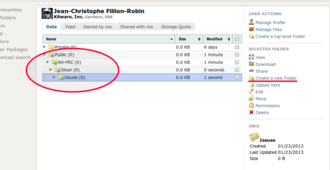
Create the directory structure
Public/NA-MIC/Slicer/Issuesclicking on the "Create new folder" link.

3. There are now two options:
3.1. Create and upload a TGZ archive.
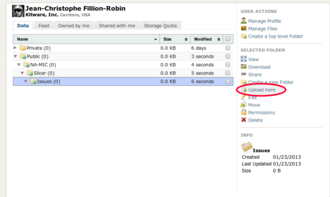
Step 1: Select the "Issues" folder and click on "Upload here".
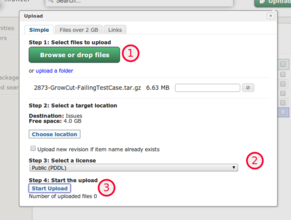
Step 2: Select TGZ archive named after your issue (1), choose a license (2) and click on Upload (3). Archive should be named after the issue.
For example: 2873-GrowCut-FailingTestCase.tar.gz
Step 3: After selecting the upload item, click on "View"
Step 4: Then click on "Edit"
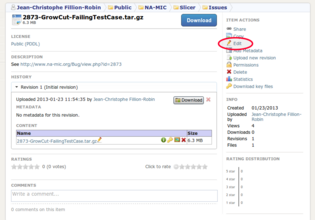
 Step 5: Update the description entering a link to the issue.
For example:See <a href="http://www.na-mic.org/Bug/view.php?id=2873">http://www.na-mic.org/Bug/view.php?id=2873</a>


|
|
An example of archive: http://slicer.kitware.com/midas3/item/13816 |
3.2. Upload a folder containing all the data.
Step 1: Select the "Issues" folder and click on "Upload here".
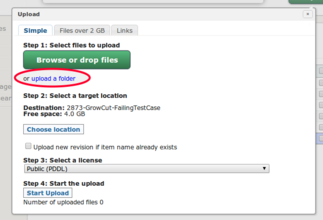
Step 2: Click on "Upload folder"
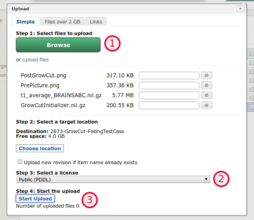
Step 3: Click on "Browse" and select folder (1), choose a license (2) and click on "Start Upload" (3)
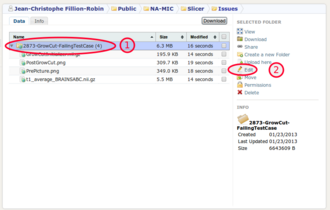
Step 4: After selecting the created folder, click on "Edit"
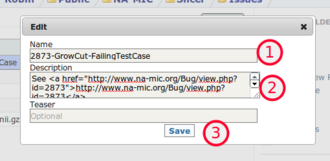 Step 5: Enter name (1), description (2) and click on "Save".
For example:
Name: 2873-GrowCut-FailingTestCase
Description:See <a href="http://www.na-mic.org/Bug/view.php?id=2873">http://www.na-mic.org/Bug/view.php?id=2873</a>


|
|
An example of folder: http://slicer.kitware.com/midas3/folder/917 |