Difference between revisions of "Documentation/Nightly/Modules/SurfaceToolbox"
(Created page with '<noinclude>{{documentation/versioncheck}}</noinclude> <!-- ---------------------------- --> {{documentation/{{documentation/version}}/module-header}} <!-- -----------------------…') |
|||
| Line 6: | Line 6: | ||
<!-- ---------------------------- --> | <!-- ---------------------------- --> | ||
{{documentation/{{documentation/version}}/module-section|Introduction and Acknowledgements}} | {{documentation/{{documentation/version}}/module-section|Introduction and Acknowledgements}} | ||
| − | + | ||
| − | |||
| − | |||
| − | |||
{{documentation/{{documentation/version}}/module-introduction-logo-gallery | {{documentation/{{documentation/version}}/module-introduction-logo-gallery | ||
|Image:Logo-namicnew2.jpg|NA-MIC | |Image:Logo-namicnew2.jpg|NA-MIC | ||
| Line 15: | Line 12: | ||
|Image:Orobix_logo.jpg|Orobix | |Image:Orobix_logo.jpg|Orobix | ||
}} | }} | ||
| − | + | ||
<!-- ---------------------------- --> | <!-- ---------------------------- --> | ||
| Line 36: | Line 33: | ||
<!-- ---------------------------- --> | <!-- ---------------------------- --> | ||
{{documentation/{{documentation/version}}/module-section|Panels}} | {{documentation/{{documentation/version}}/module-section|Panels}} | ||
| − | |||
Select the input and output models, and then enable the stages of the pipeline by selecting the buttons. Stages that include parameters will open up when they are enabled. Click apply to activate the pipeline and then click the Toggle button to compare the model before and after the operation. | Select the input and output models, and then enable the stages of the pipeline by selecting the buttons. Stages that include parameters will open up when they are enabled. Click apply to activate the pipeline and then click the Toggle button to compare the model before and after the operation. | ||
| Line 47: | Line 43: | ||
{{documentation/{{documentation/version}}/module-section|Information for Developers}} | {{documentation/{{documentation/version}}/module-section|Information for Developers}} | ||
{{documentation/{{documentation/version}}/module-developerinfo}} | {{documentation/{{documentation/version}}/module-developerinfo}} | ||
| − | + | This is a scripted module. | |
<!-- ---------------------------- --> | <!-- ---------------------------- --> | ||
{{documentation/{{documentation/version}}/module-footer}} | {{documentation/{{documentation/version}}/module-footer}} | ||
<!-- ---------------------------- --> | <!-- ---------------------------- --> | ||
Revision as of 00:21, 22 August 2013
Home < Documentation < Nightly < Modules < SurfaceToolbox
|
For the latest Slicer documentation, visit the read-the-docs. |
Introduction and Acknowledgements
|
Module Description
Use Cases
This module supports various cleanup and optimization processes on surface models. For example, a noisy image data set can lead to models that have bumpy surfaces which do not accurately depict the actual anatomy of interest. In this case, the model can be smoothed to better approximate the actual surface. Another application is to reduce the geometric complexity of surface models to reduce the file size or rendering time of the models.
Tutorials
N/A
Panels
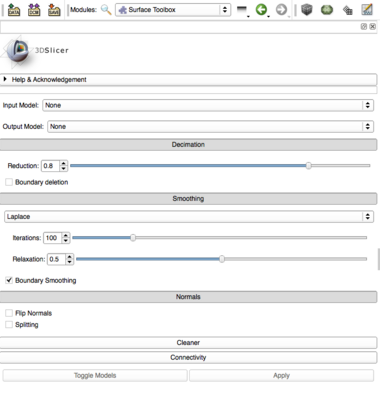
Select the input and output models, and then enable the stages of the pipeline by selecting the buttons. Stages that include parameters will open up when they are enabled. Click apply to activate the pipeline and then click the Toggle button to compare the model before and after the operation.
References
N/A
Information for Developers
| Section under construction. |
This is a scripted module.


