Difference between revisions of "Documentation/Nightly/Extensions/MatlabBridge"
| Line 5: | Line 5: | ||
<!-- ---------------------------- --> | <!-- ---------------------------- --> | ||
{{documentation/{{documentation/version}}/module-section|Introduction and Acknowledgements}} | {{documentation/{{documentation/version}}/module-section|Introduction and Acknowledgements}} | ||
| − | Author: Andras Lasso (PerkLab, Queen's University), Jean-Christophe Fillion-Robin (Kitware), Kevin Wang (Radiation Medicine Program, Princess Margaret Hospital, University Health Network Toronto)<br> | + | Author: Andras Lasso (PerkLab, Queen's University), Jean-Christophe Fillion-Robin (Kitware), Kevin Wang (Radiation Medicine Program, Princess Margaret Hospital, University Health Network Toronto), Gabor Fichtinger (PerkLab, Queen's University)<br> |
Contact: Andras Lasso, <email>lasso@cs.queensu.ca</email><br> | Contact: Andras Lasso, <email>lasso@cs.queensu.ca</email><br> | ||
Project website: http://www.slicerrt.org<br> | Project website: http://www.slicerrt.org<br> | ||
| Line 57: | Line 57: | ||
<!-- ---------------------------- --> | <!-- ---------------------------- --> | ||
{{documentation/{{documentation/version}}/extension-section|Tutorials}} | {{documentation/{{documentation/version}}/extension-section|Tutorials}} | ||
| − | + | *[http://www.na-mic.org/Wiki/index.php/File:MatlabBrigeTutorial.pdf Comprehensive MatlabBridge tutorial: how to create, run, customize Matlab modules] | |
| − | |||
| − | |||
| − | |||
| − | |||
| − | * | ||
| − | |||
| − | |||
| − | |||
| − | |||
| − | |||
| − | |||
| − | |||
| − | |||
| − | |||
| − | |||
| − | |||
| − | |||
| − | |||
| − | |||
| − | |||
| − | |||
| − | |||
| − | |||
| − | |||
| − | |||
| − | |||
| − | |||
| − | |||
| − | |||
| − | |||
| − | |||
| − | |||
| − | |||
| − | |||
| − | |||
| − | |||
| − | |||
| − | |||
| − | |||
| − | |||
| − | |||
| − | |||
| − | |||
| − | |||
| − | |||
| − | |||
| − | |||
| − | |||
| − | |||
| − | |||
| − | |||
| − | |||
| − | |||
| − | |||
| − | |||
| − | |||
| − | |||
| − | |||
| − | |||
| − | |||
| − | |||
| − | |||
| − | |||
| − | |||
| − | |||
| − | |||
| − | |||
| − | |||
| − | |||
| − | |||
| − | |||
| − | |||
| − | |||
| − | |||
| − | |||
| − | |||
| − | |||
| − | |||
| − | |||
| − | |||
| − | |||
| − | |||
| − | |||
| − | |||
| − | |||
| − | |||
| − | |||
| − | |||
| − | |||
| − | |||
| − | |||
| − | |||
| − | |||
| − | |||
| − | |||
| − | |||
| − | |||
| − | |||
| − | |||
<!-- ---------------------------- --> | <!-- ---------------------------- --> | ||
Revision as of 04:40, 9 July 2013
Home < Documentation < Nightly < Extensions < MatlabBridge
|
For the latest Slicer documentation, visit the read-the-docs. |
Introduction and Acknowledgements
Author: Andras Lasso (PerkLab, Queen's University), Jean-Christophe Fillion-Robin (Kitware), Kevin Wang (Radiation Medicine Program, Princess Margaret Hospital, University Health Network Toronto), Gabor Fichtinger (PerkLab, Queen's University)
Contact: Andras Lasso, <email>lasso@cs.queensu.ca</email>
Project website: http://www.slicerrt.org
License: Slicer license
|


Extension Description

|
MatlabBridge is an extension of 3D Slicer to allow running Matlab functions directly in 3D Slicer. Highlights:
The Matlab module behaves exactly as any other command-line-interface module, the Matlab engine is started automatically in the background (and it is kept running in the background so that you don’t have to wait for Matlab startup each time you run your function) Demo videos: |
Modules
- Matlab Module Generator (in the module list: Developer Tools / Matlab)
- Matlab Commander (in the module list: Developer Tools / Matlab)
Use Cases
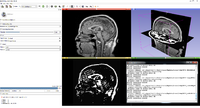
Example Matlab module user interface in Slicer
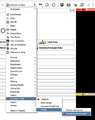
Matlab Bridge modules appear under the Developer Tools / Matlab category
A skeleton Matlab script can be created and installed using the Matlab module generator.

The Matlab Commander allows running any commands from the user interface or from another Slicer module.


Tutorials
Information for Developers
- Source code: https://subversion.assembla.com/svn/slicerrt/trunk/MatlabBridge/
- Issue tracker: open issues and enhancement requests
- See some information on the design of the module at the 2013 Summer Project week wiki.
Tested with Matlab R2012a and R2013a.