Difference between revisions of "Documentation/Nightly/Developers/Tutorials/BuildTestPackageDistributeExtensions"
m |
m |
||
| Line 15: | Line 15: | ||
<li><p>Implement your extension. <code>Hack, hack, hack :)</code>. Make sure to commit often using meaningful commit message.</p></li> | <li><p>Implement your extension. <code>Hack, hack, hack :)</code>. Make sure to commit often using meaningful commit message.</p></li> | ||
| − | <li><p>[[Documentation/{{documentation/version}}/Developers/Tutorials/DocumentExtension|Create a documentation page for your extension]].</p></li> | + | <li><p>[[Documentation/{{documentation/version}}/Developers/Tutorials/DocumentExtension#Extension_page|Create a documentation page for your extension]].</p></li> |
<li><p>If not already done, send an email on the [http://massmail.bwh.harvard.edu/mailman/listinfo/slicer-devel slicer developers list] asking to be granted write permission on the [http://slicer.kitware.com/midas3/folder/253 experimental folder].</p></li> | <li><p>If not already done, send an email on the [http://massmail.bwh.harvard.edu/mailman/listinfo/slicer-devel slicer developers list] asking to be granted write permission on the [http://slicer.kitware.com/midas3/folder/253 experimental folder].</p></li> | ||
Revision as of 01:19, 13 June 2013
Home < Documentation < Nightly < Developers < Tutorials < BuildTestPackageDistributeExtensionsStep-by-step: How to create, publish and distribute an extension ?
(Optionally) Present your extension(s) on the slicer developers list to check if other developer are working on a similar project, to seek for advice or to reach out for potential collaborator.
Build Slicer application in
ReleaseUse the Wizard to easily create an extension containing one or more Slicer modules.
Create a repository to save your work. We recommend GitHub
Implement your extension.
Hack, hack, hack :). Make sure to commit often using meaningful commit message.If not already done, send an email on the slicer developers list asking to be granted write permission on the experimental folder.
Create an account on the extension server and obtain an API Key. You can then used your midas login and api key to substitute
<YOUR-MIDAS-LOGIN>and<YOUR-MIDAS-APIKEY>in the examples.Assuming the source code of your extension is located in folder
MyExtension, you could upload your extension doing:Makefile Visual Studio $ mkdir MyExtension-build $ cd MyExtension-build $ cmake -DCMAKE_BUILD_TYPE:STRING=Release -DMIDAS_PACKAGE_EMAIL:STRING=<YOUR-MIDAS-LOGIN> -DMIDAS_PACKAGE_API_KEY:STRING=<YOUR-MIDAS-APIKEY> -DSlicer_DIR:PATH=/path/to/Slicer-Superbuild/Slicer-build ../MyExtension $ make ExperimentalUpload
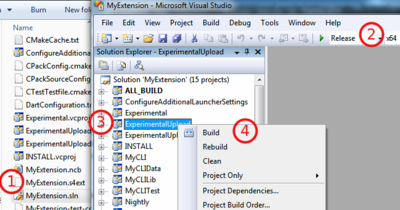
- Start CMake, select source and build directory
- Add
Slicer_DIR,MIDAS_PACKAGE_EMAILandMIDAS_PACKAGE_API_KEYentries to the cache - Click on
Configure, select Generator, then click onGeneratebutton. - Open
MyExtension.sln(1), selectReleaseconfiguration (2), selectExperimentalUpload(3) andBuild(4).

Check submission results on the dashboard: http://slicer.cdash.org/index.php?project=Slicer4#Extensions-Experimental
Check that the extension can be installed by starting the Slicer executable from
/path/to/Slicer-Superbuild/Slicer-buildand installing your extension as explained here.If you consider your extension ready for distribution, follow these instructions. to contribute the already generated description file.

