Difference between revisions of "Documentation/4.0/SlicerApplication/LoadingData"
(Add favorites) |
(Prepend documentation/versioncheck template. See http://na-mic.org/Mantis/view.php?id=2887) |
||
| (81 intermediate revisions by 3 users not shown) | |||
| Line 1: | Line 1: | ||
| + | <noinclude>{{documentation/versioncheck}}</noinclude> | ||
<!-- ---------------------------- --> | <!-- ---------------------------- --> | ||
{{documentation/{{documentation/version}}/slicerapplication-header}} | {{documentation/{{documentation/version}}/slicerapplication-header}} | ||
<!-- ---------------------------- --> | <!-- ---------------------------- --> | ||
| + | __NOTOC__ | ||
=Introduction= | =Introduction= | ||
| − | Slicer can load a large variety of data in multiple ways. | + | Slicer can load a large variety of data in multiple ways. For Dicom data, please refer to the [[Documentation/{{documentation/version}}/Modules/DICOM|DICOM]] module documentation. For almost everything else (including scenes), you can use the '''Add Data''' dialogue. For a listing of supported data formats see [[Documentation/{{documentation/version}}/SlicerApplication/SupportedDataFormat|here]]. Please note that some of the formats listed are only partially supported. |
| − | + | ||
| − | + | For some of the more complicated formats (DWI in particular) it is recommended to first convert the DICOM data into the <code>nrrd</code> format using the [[Documentation/{{documentation/version}}/Modules/DicomToNrrdConverter|DICOM to nrrd converter]] and then to load the nrrd file into Slicer. Many vendors are using non standard ways to describe their DWI data in the DICOM headers. The DICOM to nrrd documentation contains a listing of specific formats that have been debugged and tested. | |
| − | { | + | |
| + | {|align="center" border="1" style="text-align:center; font-size:120%; border-spacing: 0; padding: 0px;" cellpadding="10" | ||
| + | |[[#Add Data| Add Data ]] | ||
| + | |[[#Add DICOM Data| Add DICOM Data ]] | ||
| + | |[[#Misc.| Misc. ]] | ||
| + | |} | ||
=Add Data= | =Add Data= | ||
| − | The '''Add | + | The '''Add Data''' dialogue allows you to load virtually any type of data that Slicer can handle. It should be used as the default way of loading data, with the exception of DICOM, which has its own interface. Data is added to the existing scene. |
| − | + | <gallery widths="300px" heights="200px" perrow="4"> | |
| + | image:SlicerApplication-AddData-Empty.png|[[Documentation/{{documentation/version}}/SlicerApplication/KeyboardShortcuts|CTRL-A]] is an application-wide key combination for bringing up the Add Data dialogue. | ||
| + | image:SlicerApplication-FileAddData.png|File/Add Data contains another link to bring up this dialogue | ||
| + | image:SlicerApplication-AddData-SlicerWelcome-mj.png|Shortcuts to the dialogue are in the Load/Save toolbar and in the [[Documentation/{{documentation/version}}/Modules/SlicerWelcome|Welcome]] module | ||
| + | </gallery> | ||
| − | |||
| − | |||
| − | |||
| − | |||
| − | |||
| − | |||
| − | === | + | ==="Add Data" Functionality=== |
*The '''Choose Directory to Add''' button adds all files inside the selected directory to the file list. | *The '''Choose Directory to Add''' button adds all files inside the selected directory to the file list. | ||
| − | *The '''Choose Files(s) to Add''' button adds all selected files to the file list. | + | *The '''[[#"Choose" File Dialogue|Choose Files(s) to Add]]''' button adds all selected files to the file list. |
| − | *The '''Show Options''' checkbox shows/hides the option column to | + | *The '''[[#Show Options|Show Options]]''' checkbox shows/hides the option column which controls properties assigned to an object at loading time. Here you can identify a file as a label map or a streamline. |
*The '''Reset''' button clears the entire list of files to load. | *The '''Reset''' button clears the entire list of files to load. | ||
*The '''Ok''' button loads all datasets in the list, and | *The '''Ok''' button loads all datasets in the list, and | ||
*The '''Cancel''' button aborts the entire load. | *The '''Cancel''' button aborts the entire load. | ||
| − | ===Choose File | + | ==="Choose" File Dialogue=== |
| − | After clicking on the “Choose Files to Add” button, a | + | <gallery widths="300px" heights="200px"> |
| − | + | image:SlicerApplication-AddData-ChooseFiles.png|After clicking on the “Choose Files to Add” button, a new File Dialogue opens. <br> It is possible to select multiple files using '''CTRL-click''' and multiple contiguous files with '''SHIFT-click'''. | |
| − | It is possible to select multiple files using ''CTRL-click'' and multiple contiguous files with ''SHIFT-click | + | image:SlicerApplication-AddData-ChooseFiles.png|Selecting a <code>.mrml</code> file will '''add''' the scene. When loaded, it will load all the objects contained in that scene. It is not necessary to individually select those files. |
| − | + | </Gallery> | |
| − | |||
| − | |||
| − | |||
| − | |||
| − | |||
| − | |||
| − | |||
| − | |||
| − | |||
| − | |||
| − | |||
| − | |||
| − | |||
| − | |||
| − | |||
| − | |||
| − | |||
| − | |||
| − | |||
| − | |||
| − | |||
| − | === | + | ===Show Options=== |
| − | + | <gallery widths="350px" heights="200px"> | |
| − | + | image:SlicerApplication-AddData-SelectedFiles.png|Once the files are selected in the '''Choose File(s)''' dialogue, they are listed in the '''Add Data''' dialogue. | |
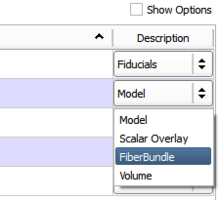
| − | + | image:SlicerApplication-AddData-ChangeType.png|You can review the selected files, and ensure that they were properly identified before loading.<br> The checkbox in the '''File''' column controls whether to load the file or not. This is handy, if you change your mind about which files to load.<br> The '''Description''' column shows the type of file automatically detected. | |
| − | + | It is used to select the reader which loads a file. Some file extensions (e.g. <code>.vtk</code>) can contain different types, e.g. ''Volumes'', ''Models'' or ''Fiber bundles''. You must ensure the correct type is selected. | |
| − | + | image:SlicerApplication-AddData-ShowOptions.png|Some objects (e.g. ''Volumes'' or ''Scalar Overlay'') can take additional specifications before loading<br>Checking the '''Show Options''' box results in the display of additional columns containing loading options, if any. | |
| − | + | </Gallery> | |
=Add DICOM Data= | =Add DICOM Data= | ||
| − | + | Beginning with Slicer 4.0, Slicer holds DICOM data in a local data base. DICOM data can be imported from disk or retrieved from a PACS system (after proper setup). | |
| + | * For more information about this module, please refer to the [[Documentation/{{documentation/version}}/Modules/DICOM|'''DICOM''']] module documentation. | ||
| + | <gallery widths="550px" heights="200px"> | ||
| + | Image:DicomModule-2012-02-21.png|The Dicom Module uses a pop-up to provide information about the selected data set. | ||
| + | Image:LoadSaveToolbar-mj.png| Shortcuts to the dialogue are in the Load/Save toolbar and in the Welcome module | ||
| + | </Gallery> | ||
| − | =Add Sample Data= | + | =Misc.= |
| − | + | ==Add Sample Data== | |
| + | This module downloads a number of sample data sets from the internet. These data sets can be used for testing of slicer capabilities. | ||
| + | * For more information about this module, please refer to the [[Documentation/{{documentation/version}}/Modules/SampleData|'''Sample Data Module''']] documentation. | ||
| + | <gallery widths="350px" heights="200px"> | ||
| + | Image:SampleData2012-02-21.png|The Sample Data Module allows downloading of sample data from a webserver. | ||
| + | </Gallery> | ||
| − | =Favorites= | + | ==Favorites== |
| − | + | In order to quickly navigate to particular locations in your file system, it is possible to define shortcuts, also known as '''Favorites'''. | |
| − | + | <gallery widths="350px" heights="200px"> | |
| − | + | Image:SlicerApplication-Favorites.png|Favorites are visible in the left column of the "File Dialogue" | |
| − | + | Image:SlicerApplication-Favorites-Add.png|Drag and drop from the list of folders on the right in order to create a new Favorite | |
| + | </Gallery> | ||
<!-- ---------------------------- --> | <!-- ---------------------------- --> | ||
{{documentation/{{documentation/version}}/slicerapplication-footer}} | {{documentation/{{documentation/version}}/slicerapplication-footer}} | ||
<!-- ---------------------------- --> | <!-- ---------------------------- --> | ||
Latest revision as of 07:34, 14 June 2013
Home < Documentation < 4.0 < SlicerApplication < LoadingData
|
For the latest Slicer documentation, visit the read-the-docs. |
Introduction
Slicer can load a large variety of data in multiple ways. For Dicom data, please refer to the DICOM module documentation. For almost everything else (including scenes), you can use the Add Data dialogue. For a listing of supported data formats see here. Please note that some of the formats listed are only partially supported.
For some of the more complicated formats (DWI in particular) it is recommended to first convert the DICOM data into the nrrd format using the DICOM to nrrd converter and then to load the nrrd file into Slicer. Many vendors are using non standard ways to describe their DWI data in the DICOM headers. The DICOM to nrrd documentation contains a listing of specific formats that have been debugged and tested.
| Add Data | Add DICOM Data | Misc. |
Add Data
The Add Data dialogue allows you to load virtually any type of data that Slicer can handle. It should be used as the default way of loading data, with the exception of DICOM, which has its own interface. Data is added to the existing scene.
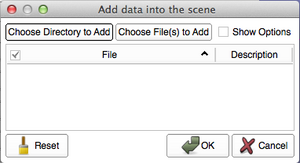
CTRL-A is an application-wide key combination for bringing up the Add Data dialogue.
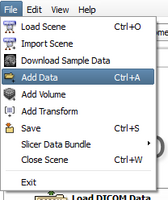
File/Add Data contains another link to bring up this dialogue
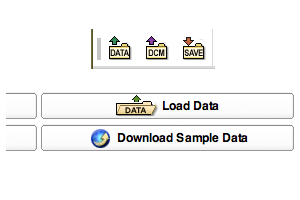
Shortcuts to the dialogue are in the Load/Save toolbar and in the Welcome module


"Add Data" Functionality
- The Choose Directory to Add button adds all files inside the selected directory to the file list.
- The Choose Files(s) to Add button adds all selected files to the file list.
- The Show Options checkbox shows/hides the option column which controls properties assigned to an object at loading time. Here you can identify a file as a label map or a streamline.
- The Reset button clears the entire list of files to load.
- The Ok button loads all datasets in the list, and
- The Cancel button aborts the entire load.
"Choose" File Dialogue

After clicking on the “Choose Files to Add” button, a new File Dialogue opens.
It is possible to select multiple files using CTRL-click and multiple contiguous files with SHIFT-click.Selecting a
.mrmlfile will add the scene. When loaded, it will load all the objects contained in that scene. It is not necessary to individually select those files.

Show Options
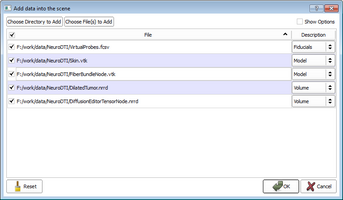
Once the files are selected in the Choose File(s) dialogue, they are listed in the Add Data dialogue.
You can review the selected files, and ensure that they were properly identified before loading.
The checkbox in the File column controls whether to load the file or not. This is handy, if you change your mind about which files to load.
The Description column shows the type of file automatically detected.
Some objects (e.g. Volumes or Scalar Overlay) can take additional specifications before loading
Checking the Show Options box results in the display of additional columns containing loading options, if any.


Add DICOM Data
Beginning with Slicer 4.0, Slicer holds DICOM data in a local data base. DICOM data can be imported from disk or retrieved from a PACS system (after proper setup).
- For more information about this module, please refer to the DICOM module documentation.
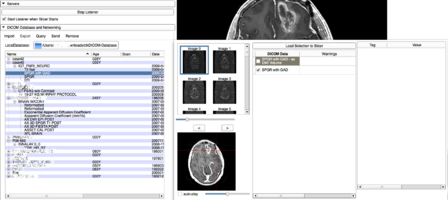
The Dicom Module uses a pop-up to provide information about the selected data set.

Shortcuts to the dialogue are in the Load/Save toolbar and in the Welcome module


Misc.
Add Sample Data
This module downloads a number of sample data sets from the internet. These data sets can be used for testing of slicer capabilities.
- For more information about this module, please refer to the Sample Data Module documentation.
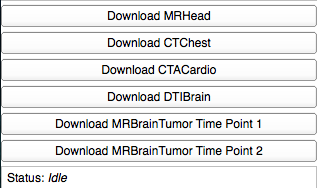
The Sample Data Module allows downloading of sample data from a webserver.

Favorites
In order to quickly navigate to particular locations in your file system, it is possible to define shortcuts, also known as Favorites.
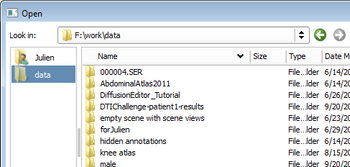
Favorites are visible in the left column of the "File Dialogue"
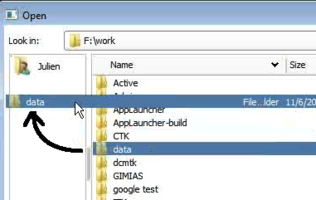
Drag and drop from the list of folders on the right in order to create a new Favorite

