Documentation/Nightly/Developers/FAQ/Python Scripting
|
For the latest Slicer documentation, visit the read-the-docs. |
Contents
- 1 Python Scripting
- 1.1 How to systematically execute custom python code at startup ?
- 1.2 How to save an image/volume using python ?
- 1.3 How to assign a volume to a Slice view ?
- 1.4 How to access vtkRenderer in Slicer 3D view ?
- 1.5 Should I used 'old style' or 'new style' python classes in my scripted module
- 1.6 How to harden a transform ?
- 1.7 Where can I find example scripts?
- 1.8 How can I use a visual debugger for step-by-step debugging
Python Scripting
How to systematically execute custom python code at startup ?
Each time Slicer starts, it will look up for a file named .slicerrc.py into your HOME folder.
How to save an image/volume using python ?
The module slicer.util provides methods allowing to save either a node or an entire scene:
- saveNode
- saveScene
For more details see:
- https://github.com/Slicer/Slicer/blob/master/Base/Python/slicer/util.py#L229-267
- https://github.com/Slicer/Slicer/blob/master/Base/Python/slicer/tests/test_slicer_util_save.py
How to assign a volume to a Slice view ?
Assuming the MRHead sample data has been loaded, you could do the following:
red_logic = slicer.app.layoutManager().sliceWidget("Red").sliceLogic()
red_cn = red_logic.GetSliceCompositeNode()
red_logic.GetSliceCompositeNode().SetBackgroundVolumeID(slicer.util.getNode('MRHead').GetID())
Discussion: http://slicer-devel.65872.n3.nabble.com/Assign-volumes-to-views-tt4028694.html
How to access vtkRenderer in Slicer 3D view ?
renderer = slicer.app.layoutManager().threeDWidget(0).threeDView().renderWindow().GetRenderers().GetFirstRenderer()
Should I used 'old style' or 'new style' python classes in my scripted module
When python classes have no superclass specified they are 'old style' as described here [1].
In general it doesn't matter for the classes in a scripted module, since they won't be subclassed either old or new style should be the same.
For other python code in slicer where you might be subclassing, it's better to use new style classes. See the class hierarchies in the EditorLib and the DICOMLib for examples.
How to harden a transform ?
>>> n = getNode('Bone')
>>> logic = slicer.vtkSlicerTransformLogic()
>>> logic.hardenTransform(n)
Discussion: http://slicer-devel.65872.n3.nabble.com/Scripting-hardened-transforms-tt4029456.html
Where can I find example scripts?
Have a look at Documentation/Nightly/ScriptRepository.
How can I use a visual debugger for step-by-step debugging
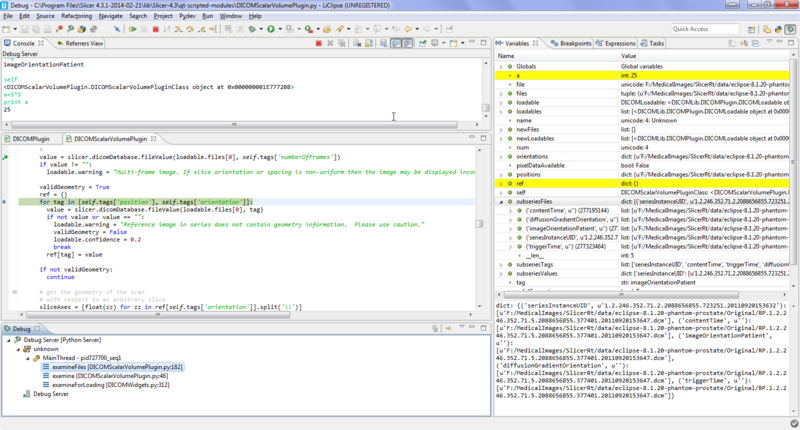
Visual debugging (setting breakpoints, execute code step-by-step, view variables, stack, etc.) of Python scripted module is possible by using PyDev.
- Install PyDev (the simplest is to use the standalone LiClipse package)
- In Pydev (if you have trouble following these steps then you can find detailed instructions here):
- Enable PyDev server: in the menu Window > Customize perspective > Command groups availability > PyDev debug
- Open the debug window: in the menu Window > Open Perspective > Other > Debug
- Start the server: on the toolbar click the button "PyDev: start the pydev server"
- In Slicer:
- Open the Python console using CTRL-3
- Enter the following lines (replace the path with the actual path on your system, where 'pydevd.py' is located):
 import sys
 sys.path.insert(0,'c:/Program Files/Brainwy/LiClipse 0.9.7/plugins/org.python.pydev_3.3.3.201401272005/pysrc')
 import pydevd
 pydevd.settrace(pydevd.settrace(stdoutToServer=True, stderrToServer=True))
If the debugger is successfully attached, then it will pause Slicer, so Slicer becomes unresponsive (until its execution is resumed).
- In PyDev:
- Slicer execution is now paused, so resume by pressing the "Resume" button on the toolbar (you may need to resume multiple times)
- Change the console to allow auto-complete and better formatting: click on "Open Console" (small button at the top of the console view) then chose "New Console View" (after this the title of the console should be "PyDev Debug Console" instead of the default "Debug Server").
