Difference between revisions of "Documentation/Nightly/Developers/Tutorials/BuildTestPackageDistributeExtensions"
| Line 70: | Line 70: | ||
<li><p>Commit the <code>YourExtensionName.s4ext</code> file to your cloned ExtensionIndex repository (provide a meaningful commit comment)</p></li> | <li><p>Commit the <code>YourExtensionName.s4ext</code> file to your cloned ExtensionIndex repository (provide a meaningful commit comment)</p></li> | ||
<li><p>Push modifications to your <code>ExtensionIndex</code> fork on github</p></li> | <li><p>Push modifications to your <code>ExtensionIndex</code> fork on github</p></li> | ||
| + | <pre> | ||
| + | git push upstream update-YourExtensionName --force # Publish the updated branch on your fork | ||
| + | </pre> | ||
<li><p>Submit a pull request to https://github.com/Slicer/ExtensionsIndex providing a meaningful commit comment. If you are using github for hosting your extension source code, Compare View mode is very helpful to summarize the changes. See the instructions how to create a compare view for example [http://jbuckley.ca/2011/09/githubs-compare-view/ here].</p></li> | <li><p>Submit a pull request to https://github.com/Slicer/ExtensionsIndex providing a meaningful commit comment. If you are using github for hosting your extension source code, Compare View mode is very helpful to summarize the changes. See the instructions how to create a compare view for example [http://jbuckley.ca/2011/09/githubs-compare-view/ here].</p></li> | ||
In short (quoting the referenced article): | In short (quoting the referenced article): | ||
| Line 112: | Line 115: | ||
<li><p>Commit the <code>YourExtensionName.s4ext</code> file to your cloned ExtensionIndex repository providing a meaningful commit comment.</p></li> | <li><p>Commit the <code>YourExtensionName.s4ext</code> file to your cloned ExtensionIndex repository providing a meaningful commit comment.</p></li> | ||
<li><p>Push modifications to your <code>ExtensionIndex</code> fork on github</p></li> | <li><p>Push modifications to your <code>ExtensionIndex</code> fork on github</p></li> | ||
| + | <pre> | ||
| + | git push upstream update-YourExtensionName-4.2 --force # Publish the updated branch on your fork | ||
| + | </pre> | ||
<li><p>Submit a pull request to https://github.com/Slicer/ExtensionsIndex providing a meaningful commit comment.</p></li> | <li><p>Submit a pull request to https://github.com/Slicer/ExtensionsIndex providing a meaningful commit comment.</p></li> | ||
</ol> | </ol> | ||
Revision as of 08:32, 26 February 2013
Home < Documentation < Nightly < Developers < Tutorials < BuildTestPackageDistributeExtensionsContents
Prerequisites
Obtain an API key to submit on the extension server
In order to upload extensions on the slicer extensions server, it is required to:
Create an account on the extension server: http://slicer.kitware.com by clicking on the
Registerlink in the top right cornerGo to NA-MIC community and click on
Join communityRetrieve your API key looking at your account details:
- Go to http://slicer.kitware.com. If needed, signin by clicking on
Loginin the top right corner. - Click on your name in the top right corner.
- Click on
My account. - Click on
APItab. Copy the
API Keyassociated withDefaultapplication.There is currently a bug preventing api key containing non alpanumeric characters from being used.
If your Default api key contain for example a/, try to delete the api key and regenerate one that is not containing "/" and is namedDefault.
We are working on the issue to update the build system so that it properly escape "/" and also get in touch with Midas team so that api key containing just number and letter are generated.
- Go to http://slicer.kitware.com. If needed, signin by clicking on
This image shows the top portion of http://slicer.kitware.com after it has been expanded by clicking the Register button.

Upload an extension in the experimental folder
Extensions index
Contributing an extension
There are multiple branches on the ExtensionsIndex:
master: This branch contain description files of extensions that will be built against Slicer nightly.- [...]
4.10: This branch contain description files of extensions that will be built against latest Slicer 4.10 available patch release.
The reasoning behind this conservative approach is that since both the Slicer API and ABI associated with Slicer base libraries are changing often, extensions available for download for a given revision of Slicer are built against that same revision of Slicer.
It means that developer willing to have their extensions available on the different versions of Slicer will have to submit pull requests for each version.
Extensions build against Slicer trunk
- See instructions on github
- Consider also reading Extension description file format
Extensions build against Slicer 4.10
- Follow instruction reported in section Requesting an extension version update / Extensions_build_against_Slicer_4.10 and set the title of the commit to be
add-<ExtensionName>.
Requesting an extension update
On your local fork, the idea is to create the following topic branches:
update-<YourExtensionName>based ofmasterintegration branch.update-<YourExtensionName>-4.2based of4.2integration branch.
Extensions build against Slicer trunk
The following instruction describes how to contribute extension description file updates for an extension being built against slicer trunk.
Update the
masterbranch of both your local clone and your onlineExtensionsIndexforkCreate or rebase branch named
update-YourExtensionNamein the clone of your forked ExtensionsIndex- If the branch
update-YourExtensionNamedoes NOT exist: - If the branch
update-YourExtensionNameexists: Regenerate the
YourExtensionName.s4extfile by configuring your extension with CMake- See https://github.com/Slicer/ExtensionsIndex#build-your-own-set-of-extensions-against-slicer-trunk-build-tree
- If the svn server needs a username and a password, edit the newly generated
YourExtensionName.s4extfile to add this information Commit the
YourExtensionName.s4extfile to your cloned ExtensionIndex repository (provide a meaningful commit comment)Push modifications to your
ExtensionIndexfork on githubSubmit a pull request to https://github.com/Slicer/ExtensionsIndex providing a meaningful commit comment. If you are using github for hosting your extension source code, Compare View mode is very helpful to summarize the changes. See the instructions how to create a compare view for example here.
git remote add upstream git://github.com/Slicer/ExtensionsIndex   # Add reference to the authoritative ExtensionsIndex
git fetch upstream                                                # Fetch change of the authoritative ExtensionsIndex
git checkout master                                               # Checkout master
git reset --hard upstream/master                                  # Reset your local master branch using the authoritative master
git push origin master                                            # Update the master branch of your online fork
git checkout -b update-YourExtensionName # Create branch update-YourExtensionName
git rebase master update-YourExtensionName # Rebase branch update-YourExtensionName onto master
git push upstream update-YourExtensionName --force # Publish the updated branch on your fork
In short (quoting the referenced article):
You can build the compare view URL manually with the following format:

https://github.com/USER/REPO/compare/[USER:]GIT-REF…[USER:]GIT-REF

USER is your GitHub username, REPO is your GitHub repository, and GIT-REF can be a tag, branch, or commit SHA1.
Extensions build against Slicer 4.10
The following instruction describes how to contribute extension description file updates for an extension being built against slicer trunk.
Update the 4.10 branch of both your local clone and your online ExtensionsIndex fork
Create or branch the branch named
update-YourExtensionName-4.2in the clone of your forked ExtensionsIndex- If the branch
update-YourExtensionNamedoes NOT exist: - If the branch
update-YourExtensionNameexists: Regenerate the
YourExtensionName.s4extfile by configuring your extension with CMake- See https://github.com/Slicer/ExtensionsIndex#build-your-own-set-of-extensions-against-slicer-trunk-build-tree.
- If the svn server needs a username and a password, edit the newly generated
YourExtensionName.s4extfile to add this information. Commit the
YourExtensionName.s4extfile to your cloned ExtensionIndex repository providing a meaningful commit comment.Push modifications to your
ExtensionIndexfork on githubSubmit a pull request to https://github.com/Slicer/ExtensionsIndex providing a meaningful commit comment.
git remote add upstream git://github.com/Slicer/ExtensionsIndex   # Add reference to the authoritative ExtensionsIndex
git fetch upstream                                                # Fetch change of the authoritative ExtensionsIndex
git checkout 4.2                                                  # Checkout 4.2
git reset --hard upstream/4.2                                     # Reset your local 4.2 branch using the authoritative 4.2
git push origin 4.2                                               # Update the 4.2 branch of your online fork
git checkout -b update-YourExtensionName-4.2 # Create branch update-YourExtensionName-4.2
git rebase master update-YourExtensionName-4.2 # Rebase branch update-YourExtensionName-4.2 onto master
git push upstream update-YourExtensionName-4.2 --force # Publish the updated branch on your fork
Submitting a pull request
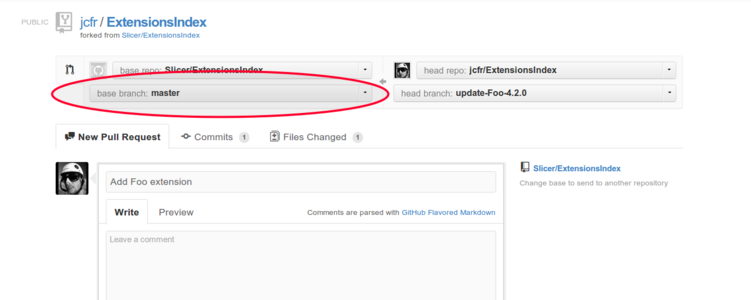
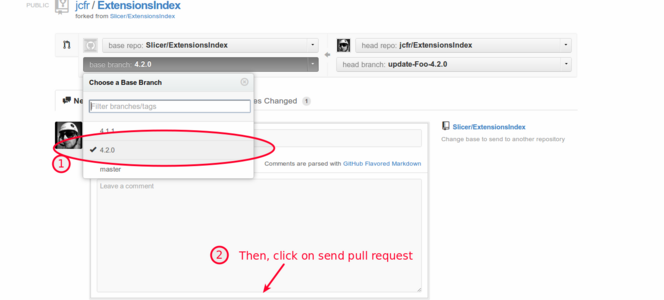
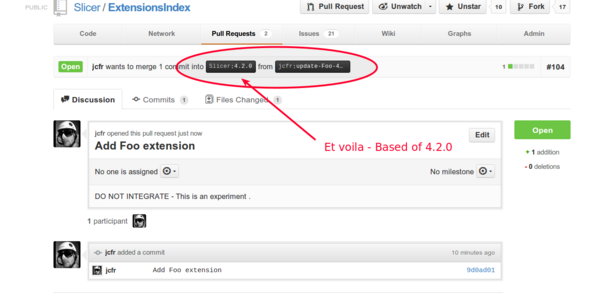
The following gallery illustrates how to submit a pull request from your ExtensionsIndex fork.
To learn more about pull request. Consider reading: https://help.github.com/articles/using-pull-requests


