|
|
| Line 41: |
Line 41: |
| | {{documentation/{{documentation/version}}/module-section|Tutorials}} | | {{documentation/{{documentation/version}}/module-section|Tutorials}} |
| | Links to tutorials that use this module | | Links to tutorials that use this module |
| | + | |
| | + | |
| | + | <!-- ---------------------------- --> |
| | + | {{documentation/{{documentation/version}}/module-section|Panels}} |
| | + | {{documentation/{{documentation/version}}/module-cli-parametersdescription|xmlurl={{documentation/{{documentation/version}}/module-cli-xmlurl|{{documentation/modulename}}|17347}} }} |
| | | | |
| | <!-- ---------------------------- --> | | <!-- ---------------------------- --> |
Revision as of 14:43, 20 October 2011
Home < Documentation < 4.0 < Modules < ModelMaker
Introduction and Acknowledgements
- This work is part of the National Alliance for Medical Image Computing (NA-MIC), funded by the National Institutes of Health through the NIH Roadmap for Medical Research, Grant U54 EB005149. Information on NA-MIC can be obtained from the NA-MIC website.
- Author: Nicole Aucoin: Brigham and Women's Hospital
- Contributor1: Bill Lorensen, GE
- Contact: Nicole Aucoin, <email>nicole@bwh.harvard.edu</email>
Template:Documentation/4.0/module-introduction-logo
Module Description
The Modelmaker is used to create 3D surface models from segmented image data, called label maps. Label maps can be the result of automated segmentation or interactive editing.
References give more details on the algorithm.
|
|
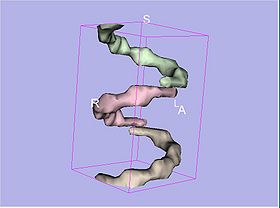 Output from running using default parameters on Slicer3/Libs/MRML/Testing/TestData/helixMask3Labels.nrrd with the non semantic color look up table |
 Output from running with joint smoothing on, smoothing interations set to 2, using Slicer3/Libs/MRML/Testing/TestData/helixMask3Labels.nrrd with the non semantic color look up table |
Template:Documentation/4.0/module-cli-description
Use Cases
Most frequently used for these scenarios:
- General Usage: Select an input volume from the label map volumes that are present in the scene. Create a new model hierarchy node. Pick a label, range of labels, or all, from which to generate a surface model. Press Apply.
- Use Case 1: After using the Editor module to segment a volume, use this module to generate a 3D surface of one segment.
- Use Case 2: When creating models from an image in which the label of interest touches the boundaries of the image, the resulting model has no vertices defined for the surfaces that touch image boundaries. Use the CropVolume module and extend the ROI beyond the image boundary. CropVolume will initialize voxels outside the image with 0s, essentially creating a padding around the volume.
- Use Case 3: After segmenting a whole region of the body, you can generate all the surface models at once by selecting the Generate All Models option.
Tutorials
Links to tutorials that use this module
Panels
Template:Documentation/4.0/module-cli-parametersdescription
Panels and their use
A list of all the panels in the interface, their features, what they mean, and how to use them:
- Model Maker panel:
- Parameters Set: The standard CLI parameter node, created automatically when the values of the GUI widgets are changed from the defaults.
- IO panel:
- The Input Volume drop down menu is populated with the label map volumes that are present in the scene, select one from which to generate models.
- Models: Models are imported into Slicer under a model hierarchy node, and their colors are set by the color table associated with the input label map volume. The model hierarchy node must be created before running the model maker, by selecting Create New ModelHierarchy from the Models drop down menu. If you're running from the command line, a model hierarchy node in a new mrml scene will be created for you (Jan/09).
- Create Multiple panel:
- Model Name: Any text entered in the entry box will be the starting string for the created model file names. The label number and the color name will also be part of the file name.
- Generate All Models: select this option if you want to create all models that correspond to all values in a labelmap volume (using the Joint Smoothing option below is useful with this option).
- Model Maker Parameters panel:
- Labels: If you specify a list of Labels, it will override any start/end label settings. If you click Generate All Models it will override the list of labels and any start/end label settings.
- Start Label: if you want to specify a continuous range of labels from which to generate models, enter the lower label here.
- End Label: if you want to specify a continuous range of labels from which to generate models, enter the higher label here.
- Skip Un-Named labels: Select this to not generate models from labels that do not have names defined in the color look up table associated with the input label map/
- Joint Smoothing will ensure that all resulting models fit together smoothly, like jigsaw puzzle pieces. Otherwise the models will be smoothed independently and may overlap.
- Smooth: Here you can set the number of smoothing iterations. Use 0 if you wish no smoothing.
- Filter Type: You can control the type of smoothing done on the models by selecting a filter type of either Sinc or Laplacian.
- Decimate: Chose the target reduction in number of polygons as a decimal percentage (between 0 and 1). Use 1 if you wish no decimation.
- You can set the flags to split normals or generate point normals in this pane as well.
- Split Normals is useful for visualizing sharp features. However it creates holes in surfaces which affects measurements.
- Point Normals is turned on if you wish to calculate the normal vectors for the points.
- Pad: Pad the input volume with zero value voxels on all 6 faces in order to ensure the production of closed surfaces. Sets the origin translation and extent translation so that the models still line up with the unpadded input volume. Default is true. New behaviour as of Feb/11.
- Save Intermediate Models: You can save a copy of the models after each of the intermediate steps (marching cubes, smoothing, and decimation if not joint smoothing, otherwise just after decimation). These intermediate models are not saved in the mrml file, you have to load them manually after turning off deleting temporary files in the tcl window (Window -> Tcl Interactor) using the following command:
[$::slicer3::CommandLineModuleGUI_Model_Maker GetLogic] DeleteTemporaryFilesOff
- Debug Panel:
- Debug: turn this flag on in order to see debugging output (look in the Error Log window that is accessed via the Window menu)
|
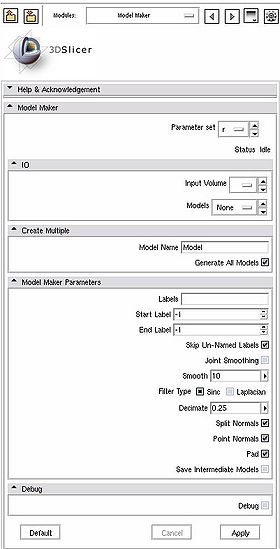 The Model Maker GUI - TO BE UPDATED |
Similar Modules
- The Volumes and Models modules are required
- Grey Scale Model Maker generates models from grey scale images.
References
Publications related to this module go here. Links to pdfs would be useful.
For extensions: link to the source code repository and additional documentation
Information for Developers


